Craft Box Design Team Post - Mini Envelope Album

Good afternoon and welcome to a new DT post for me. I applied for the Craft Box DT post ages ago and will admit I actually forgot that I had done it until the lovely Anna added me to a Facebook group just for the team. With everything else going on at work, it had completely slipped my mind, so was a lovely surprise to find out I had made the team!

Anyway I got my box of goodies this week and thought I would have a play and do something a little different for me! In the box were 4 pearlescent mini envelopes and I knew I wanted to use them somehow to make a mini album. After browsing on Pinterest I decided to make this cute album.

I used lots of goodies from the box including the patterned papers, flowers, pearls, charm, gem, washi tape/stickers and envelopes of course.

Here is the box closed...


And opened... I added a couple of tags on the inside folds to add some journaling to.


And with the inserts showing the washi tape/stickers, to which photos or more journaling could be added. A completely different style of project for me, but I had lots of fun playing around creating this one! 

This mini envelope album is also for

Recipe:

Stamps: None! 

Papers: Early Espresso from Stampin' Up, Patterned papers & White card both from November 2106 Craft Box

Inks: None! 

Accessories: Early Espresso Twine from Stampin' Up, Border Stitch Die CR1250 from Marianne Designs, California Collection Tag Die from Creative Expressions, Flowers, Pearls, Gem, Key Charm, Lock Charm, Filigree Metal Plate & Envelopes all from November 2016 Craft Box

And that's all from me for this post folks! Thanks for stopping by and don't forget to pop on over to the Craft Box Facebook Group where you will find lots more inspiration using this month's Craft Box. 


Crafty Sentiments Challenge - Glitter

Good morning and welcome to my final GDT post for Crafty Sentiments. I have been a Guest Designer for the last 6 months and that time has just flown by, but it is now time for me step down from the team and say a big thank you to both Celine and Suzette for inviting me to join them and for asking me to stay on the team. Unfortunately I just don't have time to keep going with so many design teams at the minute as my workload at school seems to just be getting heavier and heavier! I seem to be spending much more time at home marking than I ever did before :(

Anyway this week's challenge is to use glitter, so we want to see lots of it on your project. I used lots of glitter paper on my card this time.

Here is the card closed... You can see all the glitter here really well on the striped paper and all the snowflakes.


And here it is open with the gorgeous Prom Dress all dressed up for a wintery ball! You can't really see very well here, but the pale blue layer of her dress is covered with silver and clear gelly roll pens and white gel pen to add some sparkle there too.


This card is also for

Recipe:

Stamps: Prom Dress from Crafty Sentiments, Christmas Sentiment Tags (Digi version) from Lili of the Valley, Winter Flurry from Card-io

Papers: Soft Sky & Night of Navy both from Stampin' Up, White Glitter Paper from Poundland, Super Smooth Card from That Craft Place, Cardboard Patterns from M & C Boutique

Inks: Soft Sky from Stampin' Up, Copic Markers, Silver and Clear Star Gelly Roll Pens, White Gel Pen

Accessories: Triptych Card Art Template & White Gesso both from Dutch Doobadoo, Shimmering Snowflake Dies & Snowflake Corner Die all from Memory Box, Snow Flourish Die from Wild Rose Studio, Gems from Papermania, Ribbon from stash

Copics Used:
Skin - E000, E00, E21, E11, E04, R20, R30
Hair - E42, E43, E44
Navy - B34, B37, B39
Light Blue - B0000, B000, B00, B01, B02
Snow - C0, B0000, B000

And that's all from me for this post folks! Thanks for stopping by and don't forget to pop on over to the Crafty Sentiments Challenge blog and check out all the other gorgeous projects from the DT and why not join in the fun whilst you are there too?! As always there are some fabulous prizes to be won!


The East Wind New Release - Aurora Flower Garden

Good evening and welcome to my new release post for The East Wind. Huge apologies that I am so late with this release, but I have been so busy with work for the last couple of weeks and end up falling asleep by about 8pm a lot of the time. I actually managed to stay awake until about 9:30 today! If work was a little less stressful during the day it would help heaps!

Anyway here is my card using Aurora Flower Garden, which I coloured up in traditional Christmas colours and made her into a quick and simple card. Just shows how these images can be used for a variety of occasions!

This card is also for

Recipe:

Stamps: Aurora Flower Garden from The East Wind

Papers: Real Red, Old Olive & Holiday Treasures DSP (Retired) all from Stampin' Up, Super Smooth Card from That Craft Place

Inks: Copic Markers, Golden Star Gelly Roll Pen

Accessories: Gold Ribbon from Stampin' Up, Poinsettia Dies, Happy & Christmas Word Die Sets all from Britannia Dies, Gold Pearl Pen from Dutch Doobadoo

Copics Used:
Skin - E000, E00, E21, E11, E04, R20, R30
Hair - E71, E74, E77, E79
Eyes - E74, E77, E79
Red - R24, R27, R29
Top - YG93, YG95, YG97, YG99
Leaves - G24, G28, G29
Background - G40, G43

And that's all from me for this post folks. Thanks for stopping by and don't forget to pop on over to the East Wind Facebook group for even more inspiration from the DT and why not join in the challenge there or on the blog as well. As always there are some fabulous prizes to be won.

Ching-Chou Kuik Inspiration post - Poinsettia Fairy

Good Morning and welcome to a last Ching-Chou Kuik inspiration post for the month of November! I got a FB memory pop up on my phone the other day for when I shared my very first DT card for this blog and it was dated 2 years ago! I cannot believe how quickly that tie has gone and I can't believe I have been on this DT for that long. Thank you so much to Kym for having me!

Anyway on to my card...I used the gorgeous Poinsettia Fairy for this one and used up some old papers with poinsettias on and my new poinsettia dies. I kept it fairly simple as I wanted her to really stand out!


Recipe:

Stamps: Poinsettia Fairy from Ching-Chou Kuik

Papers: Real Red, Old Olive & Holiday Treasures DSP (Retired) all from Stampin' Up, Super Smooth Card from That Craft Place

Inks: Copic Markers, Golden Star Gelly Roll Pen

Accessories: Whisper White Ribbon (Retired) from Stampin' Up, Poinsettia Dies, Happy Word Set Dies & Christmas Word Set Dies all from Britannia Dies, Gold Pearl Pen from Dutch Doobadoo

Copics Used:
Skin - E000, E00, E21, E11, E04, R20, R30
Hair - E71, E74, E77
Skirt - E44, E47 E49
Red - R32, R35, R37, R39
Green - YG93, YG95, YG997
Wings - G82, G85, YR31

And that's all from me for this post folks! Thanks for stopping by and don't forget to pop on over to the Ching-Chou Kuik Inspiration and Challenge blog and check out all the other gorgeous projects from the DT this week and why not join in our monthly challenge whilst you are there - there are still a few days left for you to enter!

The Paper Shelter Challenge #274 Bingo!

Good morning and welcome to my DT post for the new challenge at The Paper Shelter. This week our challenge is a bingo board challenge and all you need to do is pick a column, row or diagonal line from the board below and include the things in that line on your project. Easy one, right?!


I chose the top row of sentiment, ribbon and pearls and came up with this card using the gorgeous Callyn

This card is also for

Recipe:

Stamps: Callyn from The Paper Shelter

Papers: Crumb Cake & Real Red both from Stampin' Up, Christmas Papers Digital Papers from Pretty Graphik, Card base from Crafts UK, Super Smooth Card from That Craft Place

Inks: Crumb Cake from Stampin' Up, Copic Markers

Accessories: Whisper White Ribbon (Retired) from Stampin' Up, Reindeer Dies from Joy Crafts, Wondrous Frame Die from Find It Media, Diamond Stickles, Pearls from stash, Happy Word Set Dies & Christmas Word Set Dies both from Britannia Dies

Copics Used:
Skin - E000, E00, E21, E11, E04, R20, R30
Hair - E13, E15, E18
Eyes - E37, E39
Hat, Dress & Lips - R32, R35, R37, R39
Sock - G43, G46
Tree Tattoo - E44, G14, G17, YG17
Present - YG95, YG97, YG99, Y21, Y23, Y26
Reindeer - E21, E23, E25, E27, E29, R20, R22, R24, R27, R29

And that's all from me for this post folks! Thanks for stopping by and don't forget to pop on over to The Paper Shelter Challenge blog and check out all the other gorgeous projects from the DT and why not join in the fun whilst you are there. As always there are some fabulous prizes to be won! 


Faery Ink New Release Demera Snow Whisper Fae

Good Morning and welcome to my DT post for the new release from Faery Ink. This month Amanda has drawn the most gorgeous collection of images and I jumped at the chance to use this beauty! How stunning is this Demera Snow Whisper Fae? Love her!

I went for more icy colours on this one using blue, aqua and lilac and I just love how it came out! See all that sparkly stuff behind the image?! This is one of my new purchases - foil strands and I love all the extra sparkle this give a project!

This card is also for

Recipe:

Stamps: Demera Snow Whisper Fae from Faery Ink, Winter Wishes Stars from Joy Crafts

Papers: Wisteria Wonder, Soft Sky, Whisper White, Silver Glimmer Card & Soft Sky Prints DSP (Retired) all from Stampin' Up, Contemporary Christmas Patterned Papers from Crafter's Companion, Super Smooth Card from That Craft Place, Card Base from Crafts Unlimited

Inks: Soft Sky from Stampin' Up, Copic Markers, Silver & Clear Star Gelly Roll Pens

Accessories: Ribbon from stash, Arch Edge Die from Crafter's Companions, Magic & Sparkle Sequins from Dovecraft, Foil Strands from Papermania, Ice Crystal Dies #1 6002/2019, #2 6002/2018 & #3 6002/2020 all from Joy Crafts

Copics Used:
Skin - E000, E00, E21, E11, E04, R20, R30
Hair - B01, B02, B04, B06
Lips - R20, R21, R24
Eyes - B12, B16, B18
Wings - B00, BV0000, BV000, BV00, BV01
Top - BV00, BV01, BV02, BV04
Background - BG10, BG11

And that's all from me for this post folks! Thanks for stopping by and don't forget to pop on over to the Faery Ink Facebook Group and Faery Ink Blog and check out all the other gorgeous new releases from the rest of the DT this month too. And why not join in our Christmas or Winter Challenge on Facebook too!

Di's Digi Designs Challenge - Harvest Happenings

Good morning everyone and welcome to my new DT post for the new challenge at Di's Digi Designs Challenge. This fortnight our challenge is Harvest Happenings and we would love to see some harvest themed projects. We don't really celebrate Harvest Festival over here in the UK, although my school does a Harvest collection every year and all the food that the children donate is given to a local homeless charity that one of our TAs volunteers with at the weekends. It is amazing the amount of food that is donated every year. Makes you feel very humble!

Anyway onto my card for today's challenge. I used the adorable Harvest Hedgehogs and kept it fairly simple for once. I actually used some of my Summertime papers from Maja Design, after holding on to them for so long and just stroking them occasionally LOL I thought the colours went really well this image too.


This card is also for
ABC Challenge T is for Three (I have 3 patterned papers, 3 flowers, 3 pieces of baker's twine and pearls in sets of 3)
Morgan's ArtWorld Challenge #23 Use and item from your stash (The pearls I have had for that long I have no idea where they came from originally and they are no longer in the packaging either!)

Recipe:

Stamps: Harvest Hedgehogs from Di's Digi Stamps, Everyday Grungy Messages from Lili of the Valley

Papers: Chocolate Chip from Stampin' Up, Summertime Patterned Papers from Maja Design, Super Smooth Card from That Craft Place, Card base from Crafts UK Unlimited

Inks: Real Red from Stampin' Up, Copic Markers

Accessories: Baker's Twine from Martha Stewart, Pearls from Stash, Flowers from Wild Orchid Crafts, Decorative Scalloped Edger Die from Joanna Sheen

Copics Used:
Hedgehogs- E40, E41, E42, E43, E44, E47
Grapes - BV11, BV13, BV17
Leaves - G82, YG63, G94, G99
Apples - R43, R35, R37, R39, E25
Basket - E9, E97, E99
Ground - E55, E57, E59

And that's all from me for this post folks! Thanks for stopping by and don't forget to pop on over to Di's Digi Designs Challenge blog and check out all the other gorgeous projects from the DT and why not join in the fun whilst you are there too?!

Ching-Chou Kuik Inspiration Post - Holly Angel

Good Morning and welcome to my inspiration post for the Ching-Chou Kuik Inspiration and Challenge blog. This week the DT's challenge was to use red, green or both for their inspiration card, so I went with both to make another Christmas card. I have about 30 made so far and will probably still need to fair few more, so any opportunity I can I make one!

I have used the gorgeous Holly Angel for this one and went for both red and green, keeping the card fairly simple for posting!


This card is also for
Recipe:

Stamps: Holly Angel from Ching-Chou Kuik, Sassy Salutations from Stampin' Up

Papers: Old Olive & Holiday Treasures DSP (Retired) both from Stampin' Up, Card base from Crafts UK Limited, Super Smooth Card from That Craft Place

Inks: Ruby Red (Retired) from Stampin' Up, Copic Markers, Clear Wink of Stella

Accessories: Old Olive Ribbon (Retired), Filigree Holly Dies from Creative Expressions

Copics Used:
Skin - E000, E00, E21, E11, E04, R20, R30
Hair - E21, E25, E27, E29
Eyes - G43, G46
Dress & Bow - R43, R35, R37, R39
Berries - RV29, R56, R59
Leaves - G94, G99
Bird & Wings - C0
Beaks - Y38
Background - G0000, G000, G00

And that's all from me for this post folks! Thanks for stopping by and don't forget to pop on over to the Ching-Chou Kuik Inspiration and Challenge blog this week to check out all the other gorgeous cards from the DT.

Art by MiRan Facebook Challenge Anything Goes for November

Good evening everyone and welcome to my DT post for the new challenge from the Art by MiRan Facebook team. I was running really late with this card as I actually thought I had made one already until I looked in the events page I had set up in our DT group and realised that the card I was thinking of was last month's! Ooops, so a couple of evenings this week, I coloured the image and then made the card. I rarely craft during the week as I am either too shattered from work or am working at home marking books instead. Luckily this week has been a little easier on marking for me!

Anyway here's the card I made using the gorgeous Winnie with her delicious cup of hot chocolate! I coloured her up in my current fave Christmas combo of red, white and brown and added some new digital papers that I bought from an etsy store the other day. They were on offer and costs me about 82p a pack, so a bought a few packs! They print so beautifully as well, so were a good purchase!


This card is also for

Recipe:

Stamps: Winnie from Art by MiRan

Papers: Early Espresso & Whisper White both from Stampin' Up, Christmas Papers PS773 from Pretty Graphik, Super Smooth Card from That Craft Place, Card base from Crafts UK Unlimited

Inks: Copic Markers, Clear Wink of Stella

Accessories: Real Red Ribbon from Stampin' Up, Snowflake Border Die from Find IT Media, Holly Jolly Merry Christmas Die from Yvonne Creations, Striped Swirl Edger Die from Creative Expressions, White Opal Liquid Pearls

Copics Used:
Skin - E000, E00, E21, E11, E04, R20, R30
Hair - E70, E71, E74, E77, E79
Eyes - E70, E71, E74
Coat - E41, E42, E43, E44
Belt - E44, E47, E49, Y28
Hat & Skirt - R22, R24, R27, R29
Cup - R46, E41

And that's all from me for this post folks! Thanks for stopping by and don't forget to pop on over to the Art by MiRan Facebook group and check out all the other gorgeous projects from the DT and why not join in the fun whilst you are there too?!

All Dressed Up Challenge Anything Goes

Good evening and welcome to my DT post for the new challenge from All Dressed Up. As always our challenge is an Anything Goes one, but you do need to use an image from All Dressed Up to enter the challenge. Not too hard considering these images are just gorgeous!

Anyway here is my card using the adorable Warm Hands, Warm Heart, which  thought would make a lovely, peaceful Christmas card. I went for an almost monochromatic colour combo using some old winter themed patterned papers that I found in my stash!


This card is also for

Recipe:

Stamps: Warm Hands, Warm Heart from All Dressed Up

Papers: Crumb Cake & Soft Suede both from Stampin' Up, Gilded Winter Patterned Papers from Trimcraft, Gold Glitter Paper from Poundland, Super Smooth Card from That Craft Place

Inks: Crumb Cake from Stampin' Up, Copic Markers, Golden Star Gelly Roll Pen

Accessories: Adorning Accents Edgelits, Chocolate Chip Ribbon (Retired) & Victoriana Lace (Retired) all from Stampin' Up, Snowflake Corner Die from Creative Expressions, LR0123 Swedish Ice Stars Dies from Marianne Designs, Adhesive Gems from Docrafts

Copics Used:
Skin - E000, E00, E21, E11, E04, R20, R30
Hair - E21, E25, E27, E29
Hat - E71, E74, E77
Jumper - E42, E43, E44
Mug - E40

And that's all from me for this post folks! Thanks for stopping by and don't forget to pop on over to  the All Dressed Up Challenge Blog and check out all the other gorgeous projects from the DT and why not join in the fun whilst you are there too?!

The East Wind Challenge #67 Oh So Shapely

Good Morning and welcome to my DT post for the new challenge from The East Wind. This time our challenge is called Oh So Shapely, so we would love to see your shaped projects or you can use a shapely image.

I used the gorgeous Aurora Reindeer and my snowglobe Dutch Doobadoo Card Art Template to make this wintery Christmas card. You can't really tell in the photo but the white paper is actually glitter paper and all the sparkle looks really pretty in real life. I added lots of white gesso around all the edges as well to act as snow.


This card is also for
Left of Center Challenge #156 Inspired by...my new snowglobe template

Recipe:

Stamps: Aurora Reindeer from The East Wind, Sending Messages from Joy Crafts

Papers: Soft Suede from Stampin' Up, White Glitter Paper from Poundland, Super Smooth Card from That Craft Place, Gilded Winter Patterned Papers from Trimcraft

Inks: Soft Suede & Whisper White both from Stampin' Up, Copic Markers

Accessories: Soft Suede Ribbon (Retired) from Stampin' Up, Reindeer Dies, Icicle Border Die 6002/2036, Christmas Trees Dies 6002/2056 & Postage Stamps Dies 6002/0324 all from Joy Crafts, Snowglobe Card Art from Dutch Doobadoo

Copics Used:
Skin - E000, E00, E21, E11, E04, R20, R30
Hair - E55, E57, E59
Hat & Fur Trims - E50, E51, E53, E55
Coat - E70, E71, E74
Reindeer - E30, E31, E33, E35, E37, E39
Trees - E87, E89
Olive Green - YG95, YG97, YG99
Background - BG0000, BG000

And that's all from me for this post folks! Thanks for stopping by and don't forget to pop on over to the East Wind Challenge blog and check out all the other gorgeous shapely projects from the DT adn why not join in the fun whilst you are there too?!

Crafty Sentiments Challenge - Snowflakes

Good Morning and welcome to my penultimate GDT post for the Crafty Sentiments Challenge blog. This week our challenge is snowflakes, so we would like to see lots of them on your project this week and for me it was an ideal opportunity to make yet another Christmas card. I do now think I may have enough by the time it comes to sending them all out. Just depends on how many my MIL wants from me!

I decided to do a fancy folded card using one of my Dutch Doobadoo card art templates and love how it came out. I used the adorable Jasmin - Winter Skates and kept to an icy, wintery colour combo!


Recipe:

Stamps: Jasmin - Winter Skates from Crafty Sentiments, Winter Wishes Stars from Joy Crafts

Papers: Pool Party, Whisper White & Winter Frost DSP (Retired) all from Stampin' Up, Super Smooth Card from That Craft Place

Inks: Pool Party from Stampin' Up, Copic Markers, Clear Star & Silver Star Gelly Roll Pens

Accessories: Silver Ribbon (Retired) from Stampin' Up, Gems from Poundland, Swing Card 6 Card Art Template from Dutch Doobadoo, Shimmering Snowflakes Dies from Memory Box, Skates Die 6002/2032 & Gloves and Hat Dies 6002/2034 both from Joy Crafts, Snowflake Border Die from Creative Expressions

Copics Used:
Skin - E000, E00, E21, E11, E04, R20, R30
Hair - E35, E37, E39
Eyes - B24, B26
Hat, Scarf, Gloves & Boots - BG32, BG34, BG13
Shorts - BG01, BG02, BG05, BG07
Jumper - BG53, BG45, BG57
Tights - B000, B00, B01, BG53, BG57
Flowers & Boot Straps - B34, B37, B39
Laces - BG10, BG11
Ground - B0000, B000, B00, C00, C0, C1, C2, C3

And that's all from me for this post folks! Thanks for stopping by and don't forget to pop on over to the Crafty Sentiments Challenge blog and check out all the other gorgeous projects from the DT and why not join in the fun whilst you are there too?

Faery Ink One Day Fae Giveaway

Good Morning and welcome to my DT post for the new One Day Fae Giveaway from Faery Ink. This month is a gorgeous image (well, what month isn't there a gorgeous image?!) and if you head on over to the Faery Ink blog you can find out how to get ahold of Ophelia Vanity Fae for yourself.

I decided to make a gift tag for something a little different and the colours were inspired by the ballet performance of Snow White that we saw during the half term holidays at the end of October. Ophelia reminded me a little of the Queen and her magic mirror, so I coloured her using the same colours as her dress - red and gold. You can't see in the photo, but her wings are all covered with Clear Wink of Stella too for a little shimmery touch as well.


Recipe:

Stamps: Ophelia Vanity Fae from Faery Ink, So To Speak from Clearly Besotted

Papers: Hello Honey (Retired), Basic Black, Love Letter DSP (Retired) & Moonlight DSP (Retired) all from Stampin' Up, Super Smooth Card from That Craft Place

Inks: Hello Honey (Retired) from Stampin' Up, Copic Markers, Clear Wink of Stella

Accessories: Baker's Twine, Ribbon & Lace all from stash, Flowers from Wild Orchid Crafts, Stitched Scallop Border Die from La-La Land Crafts, Doo Hickey Cute Corners Die from Magnolia

Copics Used:
Skin - E000, E00, E21, E11, E04, R20, R30
Hair - C5, C7, C9
Eyes - YG14, YG17
Eyeshadow - T1, T4
Red - R24, R27, R29
Skirt - Y21, Y26, Y28
Wings - YR0000, YR31, Y00, Y21, Y23
Mirror - C1, C2, C3, C5
Leaves - YG05, YG09
Brush - E35, E37, E39
Ground - E70, E71, E74

And that's all from me for this post folks! Thanks for stopping by and don't forget to pop on over to the Faery Ink Facebook group and check out all the other fabulous inspiration from the rest of the DT this month!

Faery Ink DT Application Post

It is time for Faery Ink's annual Design Team call and I thought I would apply again as I have loved being part of the DT this last 6 months. I love all the images and really struggle every month choosing the ones to use for my DT projects as I want to use them all LOL

My love of Faery Ink started a few years ago whilst hunting for fairy images on Etsy and came across a cute butterfly catching one and a steampunk one. A few months later my collection was growing and I am now the proud owner of about 170 images! Wow! Even that number shocked me! I do know that there are quite a few I haven't used yet, so I need to change that!

I don't have a particular favourite Faery Ink image as it all depends on my mood and the style of project I am making, but I really do love the collections that Amanda has created this last year, especially the Ophelia in Wonderland and the Destiny in Oz collections. The canvas I made with the Oz collections is by far one of my favourite things I have ever made and it hangs in pride of place above my bedroom door, so I see it every time I walk out of the room. It still makes me smile! A lot!


As a busy primary school teacher, I tend to do all my crafting at the weekends as it gives me that much needed stress relief. I try, but don't always succeed, to colour during the week, when I have an evening off from marking, but my Saturday and Sunday daytimes are always spent crafting away! I use Copics as my medium of choice for at least 7 years now I think and feel that I am getting better and better with them all the time. I have been taking classes with Kit and Clowder as well as with Faye Wynne-Jones, although not as regularly as I want. I love watching tutorials online to see how different colourists do things differently I believe there is always room for improvement in my colouring and crafting, so am always willing to give new things a try too.

I do love making cards, but have also started this year to create more mixed media canvases and I also started a quote journal. This is basically a journal in which I create pages using an image and a quote that I like, a quote that may not be quite one I would use on a card, but one I love anyway and feel inspired by. Being an Alice in Wonderland fan, I just had to use this quote from her on one of my journals pages using the gorgeous Ophelia as Alice. This was the first page of my quote journal after reading this quote on Pinterest and kick started my whole project idea.


I am on several design teams at the minute, but have made the decision to cut back on some of these from the New Year to give myself more time to properly dedicate myself to the teams I am on. I think the attraction of being on a design team is amazing, but sometimes the work you need to put in to be an effective team member is more than expected. I have now decided I want to be on less design teams, but do the ones I am on more efficiently and effectively, being more active in the Facebook groups with members and fans and basically being a better design team member. In turn this will give me more time each week, possibly even daily, to spend online, creating projects and sharing them in social media, such as Pinterest and Facebook. I have also just signed up for Instagram, but need to have a play with this really to work out what I am doing on there! LOL Through my blog I enter as many of my projects as possible into various challenges as well as share them on Facebook and Pinterest and hopefully will be adding them to Instagram shortly too!

As from January, I will be on Art by Miran (Facebook Challenge Coordinator), Ching-Chou Kuik Challenge blog team, The Paper Shelter Design Team, My Besties Facebook New Release Team and Craft Box Design Team. This is a total of 11 expected projects each month, which, for me, is much more manageable than the 22 or so I have been doing the last few months. I know I will now be able to spend a lot more time creating different projects that take more time, such as 3D projects than I have been able to in the past due to time constraints. I don't generally sell my projects, but do give lots away to friends and family, but all my 3D projects are displayed around my bedroom/craft room, except for my Hallowe'en ones which are packed away ready to be displayed each year!

Design Teams are an important part of any designer's profile to help their images be noticed, to raise their profile, demonstrate the versatility of the images and to generate interest with other like-minded people. It is also a great opportunity for me to showcase my skills and style and to create something that not only I love, but that will hopefully inspire others too. I love colouring and creating and find that when I love an image, the colouring and creating is made so much easier. I find that I never lose my mojo when it comes to creating with Faery Ink images, which can happen with other images that I have to work with, rather than ones I have chosen to work with!

I have never really thought about what my higher purpose in life is. I guess as a teacher by day, my purpose is to teach, inspire and encourage others to develop themselves, to discover things that inspire them, that they will learn to love. I am a huge reader and am never without a book on the go and I try to instill that love of reading into my class every week. I tell them all about the books I read (without the gory details though as I read a lot of Urban Fantasy books, which can be a bit gruesome and not suitable for 9 year old ears!), but I want to inspire others and I hope that through my crafting I can inspire others there too. Maybe it sounds selfish and big headed, but I would love someone to look at one of my cards or projects and use it as an inspiration for their own - maybe just the colours I used, or the layout or something as simple as the embellishments I have used. I know I am constantly inspired by the projects I see and hope that I can do the same!

The sentiment on this canvas using the gorgeous Amber Postal Punk is just a perfect one for me! This was my first attempt at the mixed media canvas. I am usually too OCD to create something as random and "messy" as this, but I loved making it and it now hangs on my bedroom wall along with another one I have made and I have plans for even more of them as I want to create a whole collection using different styles, colours and images!


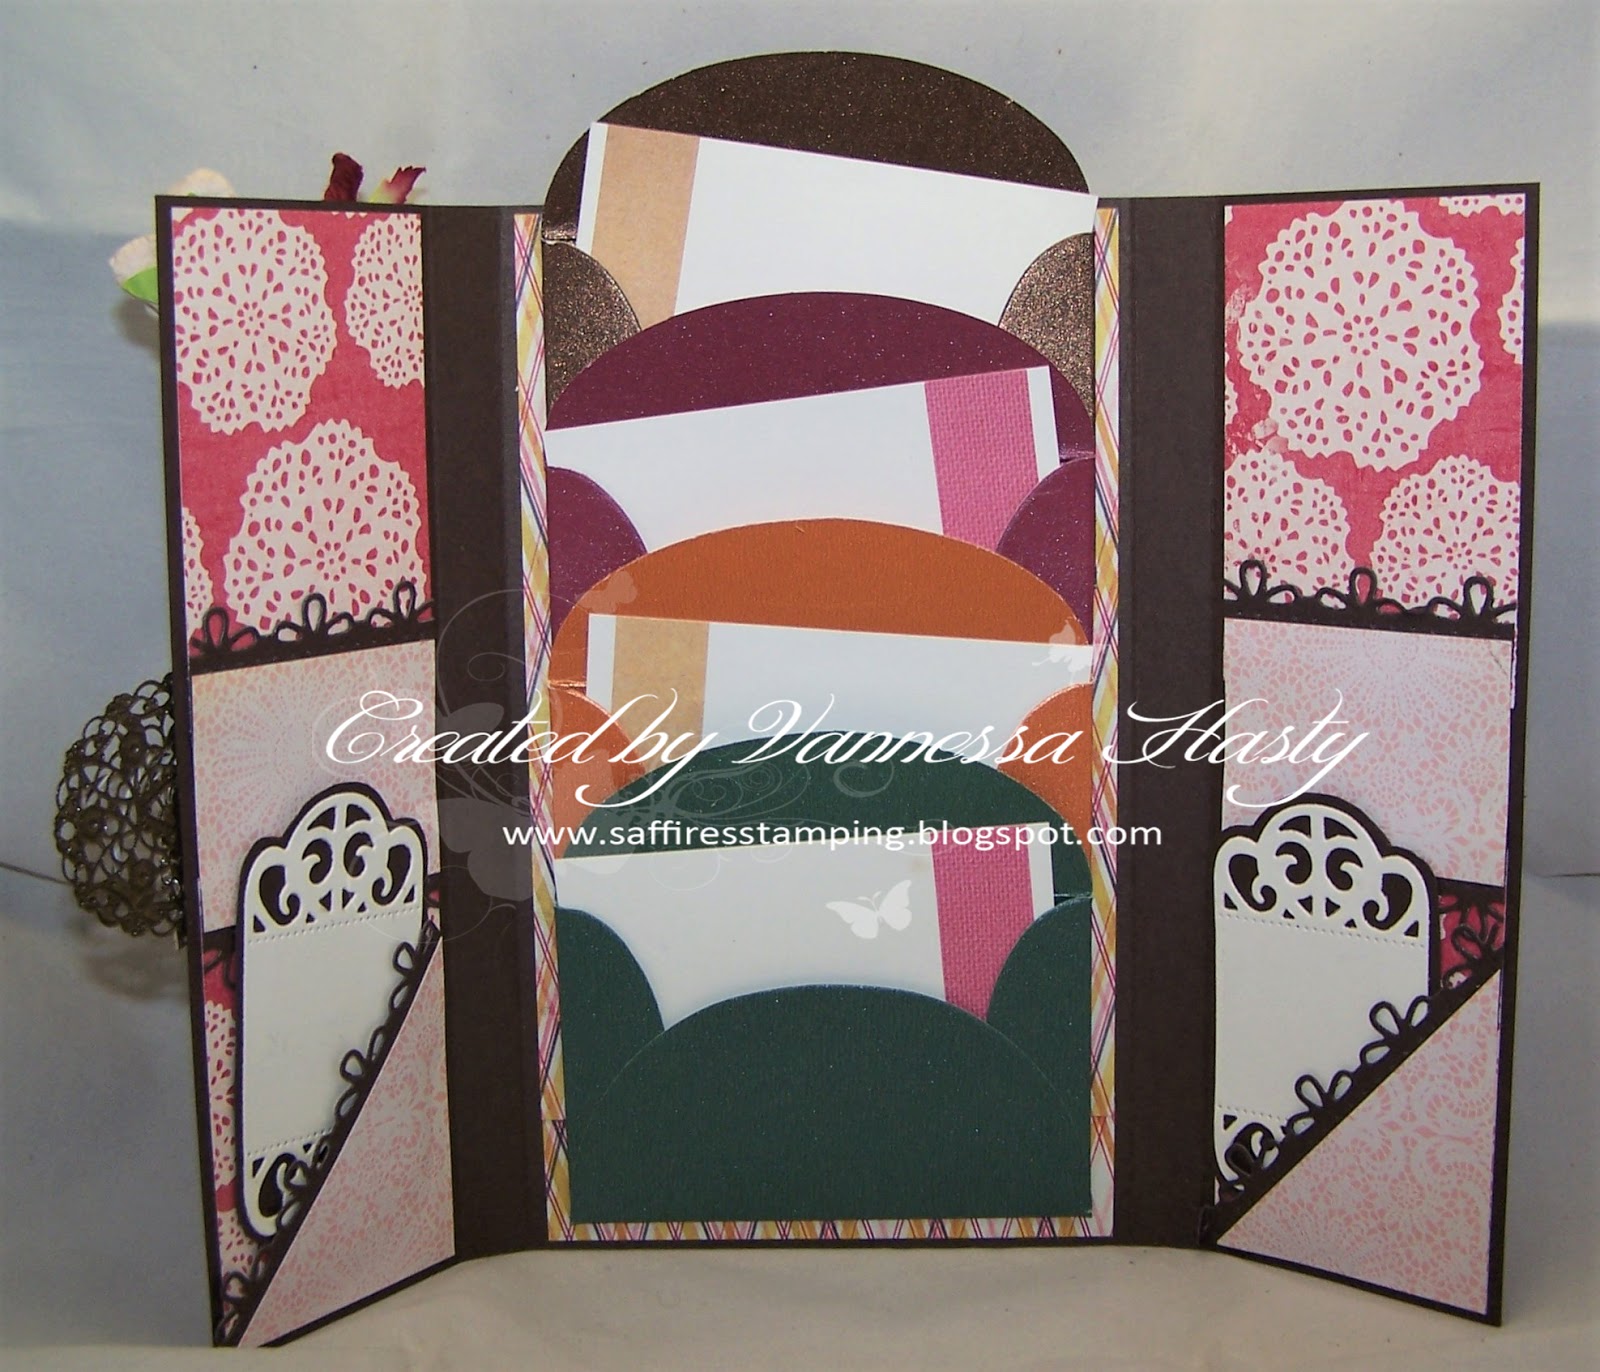
This is the project I have made using the gorgeous Fairy Queen Bee. Although I'm not a fan of bees in real life having been stung by one as a child, this image just emits a calming, peaceful feel to me and I love creating this card with her. This is my typical style - lots of layers, ribbons, frilly things and pretty die cuts!


Thank you to Amanda for being part of her design team for the last 6 months and thanks also for the opportunity in applying again!

Ching-Chou Kuik November Challenge - Christmas

Good Morning and welcome to my DT post for the new challenge from Ching-Chou Kuik Inspiration and Challenge blog. This month we are celebrating another festival/celebration coming up soon - yep you got it! Christmas!

I chose to use the adorable Gingerbread Man Parade to match with my new patterned papers from Stampin' Up which also have a gingerbread man theme and went for matching colours too.


Recipe:

Stamps: Gingerbread Man Parade from Ching-Chou Kuik, Holiday Lights from Papertrey Ink

Papers: Real Red,Early Espresso, Baked Brown Sugar (Retired), Whisper White  Candy Cane Lane DSP all from Stampin' Up, Super Smooth Card from That Craft Place

Inks: Real Red from Stampin' Up, Copic Markers

Accessories: Heart Border Die from Papertrey Ink, Gingerbread Man Die from X-Cut

Copics Used:
Skin - E000, E00, E21, E11, E04, R20, R30
Hair - E70, E71, E74, E77
Eyes - E55, E57, E59
Dress - YG63, YG67, G24, G28, G29
Gingerbread Men- E31, E33, E35
Lolly Sticks - E23, E25
Red - R35, R37
Berries - R37, R39
Carrot Nose - YR04, YR07
Scarf - G94, G99
Top Hat - C5, C7, C9
Ground - E42, E43, E44

And that's all from me for this post folks! Thanks for stopping by and don't forget to pop on over to the Ching-Chou Kuik Inspiration and Challenge blog and check out all the other gorgeous cards from the DT and why not join in the fun whilst you are there too?!

The Paper Shelter Challenge #272 Christmas is Coming

Good Morning everyone and welcome to my post for the new challenge from The Paper Shelter. This week our challenge is called Christmas is Coming, so we would like you to create something for the upcoming festivities.

I used the fabulous Santa's Family Selfie and made a little gift treat box in a card! It looks like a card from the outside measuring 5 inch square....


And then on the inside is a little box to add a small gift. I just happened to have a box of candy canes and they were the perfect fit! 

This gift box card is also for

Recipe:

Stamps: Santa's Family Selfie from The Paper Shelter, Merry Little Christmas from Stampin' Up

Papers: Crumb Cake, Early Espresso & Candy Cane Lane DSP all from Stampin' Up, Super Smooth Card from That Craft Place

Inks: Real Red from Stampin' Up, Copic Markers

Accessories: Early Espresso Ribbon (Retired) from Stampin' Up

Copics Used:
Skin - E000, E00, E21, E11, E04, R20, R30
Hair - C00, C0, C1
Red - R22, R24, R27, R29
Black - C3, C5, C7, C9
Olive Green - YG93, YG95, YG97
Gold - Y21, Y23, Y26
Poinsettia - R35, R56, R89, R59
Leaves - YG61, YG67
Rudolph - E41, E42, E43, E44, E47, E49
Background - E40, E41

And that's all from me for this post folks! Thanks for stopping by and don't forget to pop on over to the Paper Shelter Challenge blog and check out all the other gorgeous projects from the DT and why not join in the fun whilst you are there too?! As always there are some fabulous prizes to be won! 


All Things Magical and Mythical #119 Featuring Mermaid Birthday Party Treasure from Faery Ink

Good morning everyone and welcome to this week's All Things Magical and Mythical post. I haven't used a Faery Ink image for ages so...