The Paper Shelter Challenge #156 - Use that Ribbon

Well it's the last day of April today and boy has this month gone fast! I guess having just over 2 weeks holiday at the beginning of the month has made it go much quicker than normal. Anyway it's time for another fantastic challenge at The Paper Shelter and this week's it's the B Team's turn and we challenge you to

Use That Ribbon!


Veronica very kindly sent all the DT a new image a while ago and I just knew what I wanted to do with it. The image is called The Beautiful Lion Tamer and she had to be in a circus tent shaped card and here it is...


I used a template from my Silhouette Studio for the base but had to cut it all out by hand as it just wouldn't go to the size I wanted and still close properly (There's still a little gaps between the "tent flaps", but I can live with that.) Took a lot of fiddling especially to add the white stripes, but it was worth it. 

The outside of the card used lots of Real Red Stitched Ribbon as well as some Baja Breeze Pleated Satin Ribbon for the roof top trim. Sadly this ribbon retired a while ago, but I still have a bit left! 

For the inside I used the gorgeous Lion Tamer image and attempted to make a circus ring type scene. What do you think? 


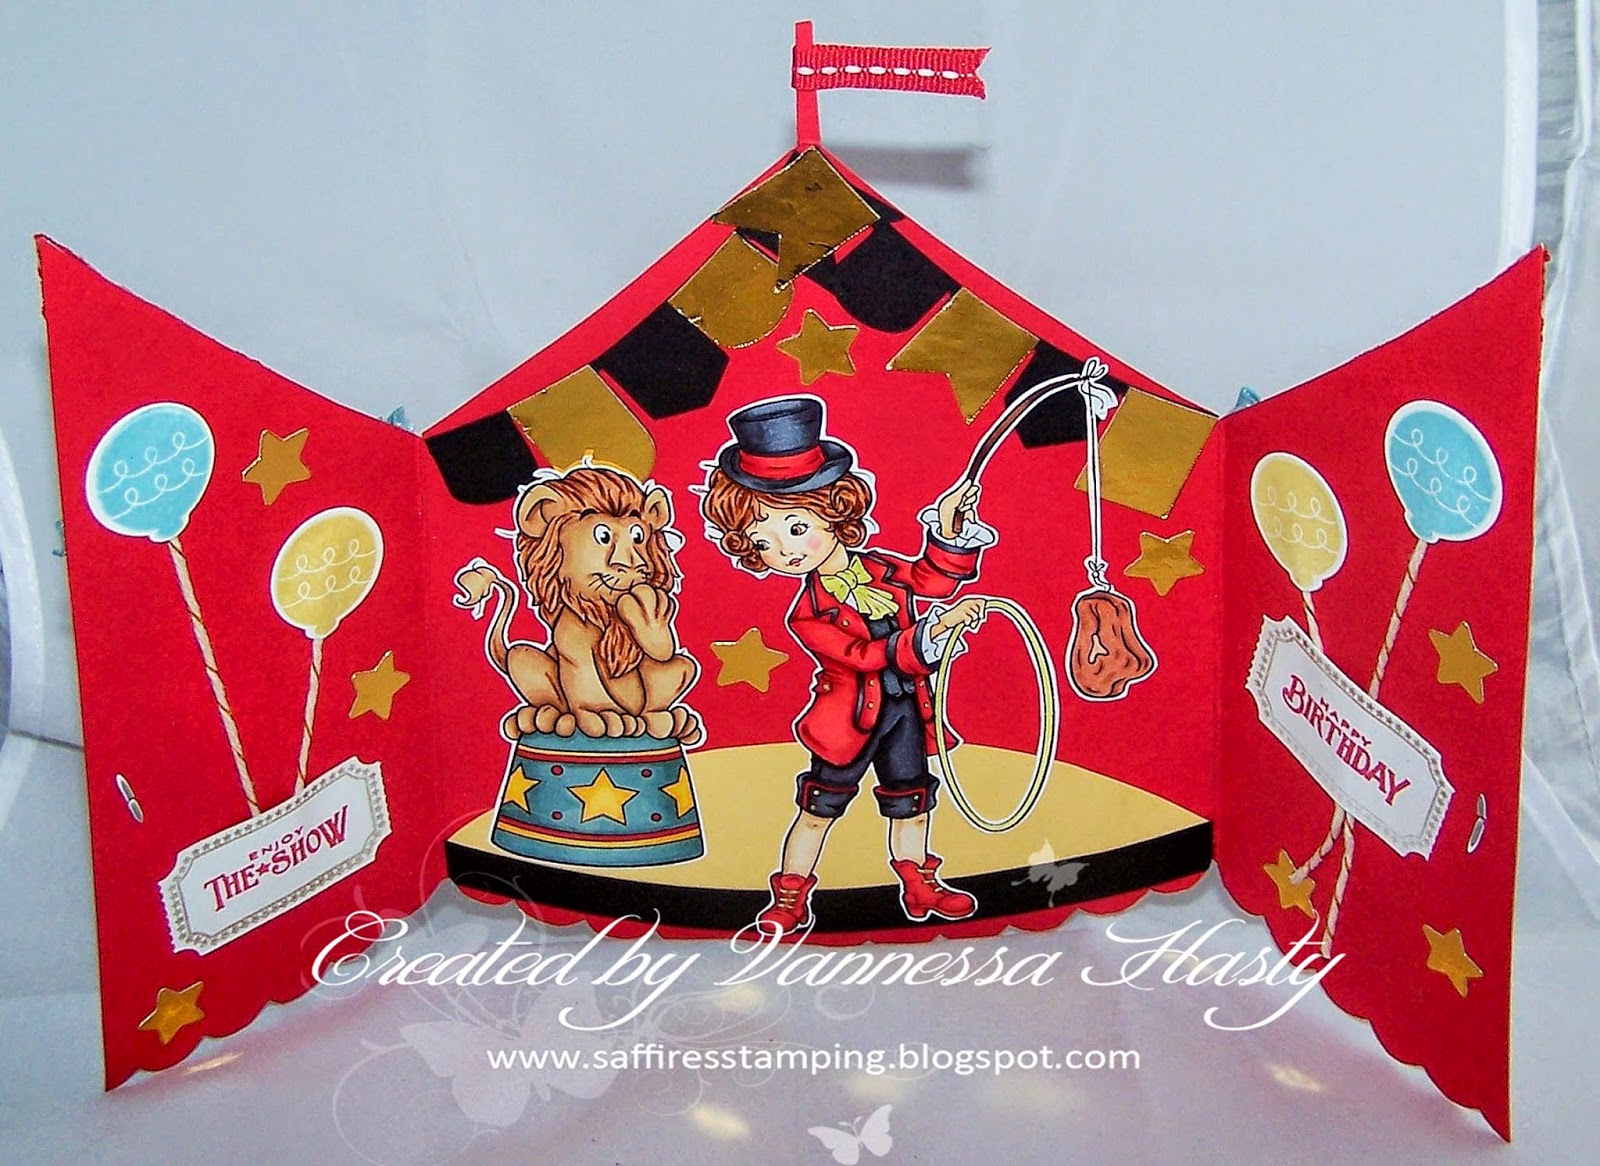
I have to say this is one of the longest card I have ever made. With all the cutting from my Silhouette Portrait which didn't work and then trying and trying again with different measurements, finally giving up on that to attempt to make my own tent shape, which looked more like a house, so back to the Silhouette it was to print a template to draw round, drawing round it twice, cutting it out, working out the stripes, the ribbons, the curved ring area, adding all the tickets, banners, stars and balloons and then all the colouring and fussy cutting I think this card took me about 5 hours to make in all! But I totally love it and had so much fun making it! 

Don't forget if you join in our challenge this week you can win some fabulous prizes. 


Recipe:

Stamps: The Beautiful Lion Tamer from The Paper Shelter, Just The Ticket, Heart-2-Heart #2 both from Papertrey Ink

Papers: Real Red, Whisper White, So Saffron, Basic Black all from Stampin' Up, Copic X-Press It Blending Card, Gold Mirri Card from local craft store

Inks: Gold Encore, Real Red, Baja Breeze (Retired), So Saffron all from Stampin' Up, Copic Markers, Golden Star Gelly Roll Pen

Accessories: Real Red Stitched Grosgrain Ribbon, Baja Breeze Pleated Satin Ribbon (Retired), Gold Baker's Twine, Holiday Collection Framelits Dies all from Stampin' Up, Brads from stash, Heart-2-Heart #2 Die, Just The Ticket Border Die both from Papertrey Ink

Copics Used:
Skin - E50, E51, E53, R20
Hair - E33, E35, E37
Red - R24, R27, R29
Black - C3, C5, C7, C9
Shirt - C1, C2
Pole - E35, e37
Meat - E11, E13, E18
Lion - E31, E33, E35, E37
Lion's Platform - BG72, BG75, R46, Y15, Y17

And that's all from me for this post folks! Thanks for stopping by and don't forget to pop on over to The Paper Shelter challenge blog and join in the fun with your ribbons this week.

Mermaid Shadow Box Card

I haven't made a shadow box card in absolute ages so when I saw Crafty Sentiments Challenge to use fancy folds, I thought I would have a go at making one. This card is also for Charisma Cardz Challenge #9 to use purple and blue, although I have added a bit of green and orange in there too, but the majority is blue.

And here it is - lots and lots of Silhouette Portrait die cuts for this one including the actual base. Love having a machine that can all these fancy shapes out for me, even if it does struggle with the thin bits like the seaweed flourishes.


I couldn't find a sentiment related to mermaids anywhere, so I cut my own out on the Silhouette as well and stuck it on. I also added loads of dew drops to be the water bubbles (finally found them after hunting for ages for them and they were not where they should have been! No wonder I couldn't find them!).

And here's a closer look at the actual mermaid...She looks a bit too brown for my liking- one of my Copics is just not right and on their own they seem fine, but when it comes to blending together, they go all blotchy. Had to do a lot of blending on this one to get it smoother and not patchy round the edges. Might just need to have a play with this combo and get right!


Recipe:

Stamps: Mermaid from The Paper Shelter, Whimsy Wheel (Retired) from Stampin' Up

Papers: Soft Sky, Elegant Eggplant, Marina Mist, Wisteria Wonder, Bermuda Bay, Tangerine Tango, Pumpkin Pie, Garden Green, Soft Sky Prints DSP (Retired) all from Stampin' Up, Copic X-Press It Blending Card

Inks: Soft Sky from Stampin' Up, Copic Markers

Accessories: Corner Rounder Punch from Stampin' Up, Dew Drops, Silhouette Portrait Die Cuts - Seashell Banner, Shadow Box Card, Seaweed Flourishes, Sentiment, Waves

Copics Used:
Skin - E0000, E000, E00, E21, E11, E04, R20
Rock - W1, W3, W5
Tail - BG10, BG11, BG13, BG15
Blue Shell - BG11, BG15
Purples - BV11, BV13, BV17
Sea - B91, B93, B95
Starfish in Hair - YR16, YR18
Crab - R02, R05
Small Starfish - YR12, YR15
Shadow - BG000, BG01

And that's all from me for today folks! Thanks for stopping by.

Elven Princess

I finally got round to buying some Aurora Wings digis last week and printed them out at work the other day ready to use this weekend. I love the images, but am quite nervous about colouring them as they are just so detailed. But in my mission to improve my colouring I jumped in with both feet and went ahead and used one today and I actually don't think it turned out too badly.

This card is for Aurora Wings Challenge #2 Monochromatic, Deep Ocean's Challenge #76 to use stitching either real or faux and for Papertake Weekly's Challenge to use white and one other colour. I cheated a bit on that one as I used 2 shades of pink - is that allowed?

And here she is. I deliberately kept her fairly small and am glad I did as the flowers took forever to colour in! The hair isn't quite the shade of pink I wanted, but I think it's ok for an elf!


Recipe:

Stamps: Elven Princess from Aurora Wings

Papers: Pink Pirouette, Rose Red, Bella Rose DSP (Retired), Sweet & Sour DSP (Retired) all from Stampin' Up, Neenah Solar Crest Paper

Inks: Rose Red Marker from Stampin' Up, Copic Markers, Clear Star Gelly Roll Pen

Accessories: Rose Red Stitched Grosgrain Ribbon, Pink Pirouette Taffeta Ribbon both from Stampin' Up, Cherish Punch Around The Page Set from Martha Stewart, Corner Die from Marianne Creatables, Flowers from Wild Orchid Crafts

Copics Used:
Skin - E000, E00, E21, E11, E04, R20
Hair - RV10, RV11, RV13
Eyes & Leaves - G43, G46
Flowers - R81, R56, R59

And that's all from me for today folks! Thanks for stopping by.

Mouse on Bluebell

I had a bit of a splurge last week with all the Easter sales on and bought myself loads of new stamps, dies and 8 packs of patterned papers! I didn't actually realise I had ordered so many until my box of goodies arrived the other day! So anyway I just had to use some of my new stash today! This card is for Crafty Little Fairies Challenge Furry Friends, Creative Inspirations Challenge #262 Cute Characters, Totally Gorjuss' Challenge #233 Cuddly and for Sketchy Challenges #72 to use Kirsty-Anne's sketch below which I adapted slightly so as not to cover up the squirrel in the top left corner.


And here's my card...


Recipe:

Stamps: Mouse on Bluebell from Wild Rose Studio, Mini Chalkboard Sentiments from Whimsy Stamps

Papers: Wisteria Wonder, Wild Wasabi both from Stampin' Up, Bluebell Patterned Papers from Wild Rose Studio, Copic X-Press It Blending Card

Inks: Wisteria Wonder from Stampin' Up, memento Tuxedo Black, Copic Markers, Silver Star Gelly Roll Pen

Accessories: Oval and Scalloped Oval Nestabilities both from Spellbinders, Baker's Twine from Martha Stewart

Copics Used:
Mouse - E40, E42, E43, R20, R30
Large Flowers - BV01, BV02, BV04
Bluebells and Ribbon on Present - BV20, BV11, BV13
Present - BV02, BV04
Grass & Leaves - YG17, YG67, G21

And that's all from me for this post folks! Thanks for stopping by.

Rose La Rouge

Thought I would enter The Stamping Chef's Challenge #26 this week and combine it with their Facebook Group Challenge as well using this very bright flower bouquet as inspiration. I'm also entering this card into A Creative Romance's Challenge to use up your scraps. Apart from the bigger background paper, the other pieces including the doily are all scraps.


I used one of my new digis, Rose La Rouge, and went for a very bright card. Love how it came out, although I do think I should have done something on the background of the Label 10 Nesties! Looks a bit plain against all the patterned paper, but that might not be too bad a thing either! 


Recipe:

Stamps: Rose La Rouge from The Stamping Chef, Signature Series: Dress Form from Papertrey Ink

Papers: Rose Red, Pumpkin Pie, Very Vanilla, Sweet & Sour DSP (Retired) all from Stampin' Up, Copic X-Press It Blending Card

Inks: Pumpkin Pie from Stampin' Up, Copic Markers

Accessories: Pear Pizzazz Seam Binding Ribbon from Stampin' Up, Filigree Border Die from Papertrey Ink, Labels 10 Nestabilities, Fancy Framed Tags 2 both from Spellbinders, Cerise Glitter Glue from Dovecraft, Die-Namics Mini Rolled Roses Dies from MFT, Paper Doily from eBay, Feathers Die Cute from Silhouette Portrait

Copics Used:
Skin - E000, E00, E21, E11, E04, R20
Hair - C3, C5, C7, C9
Pink - RV14, RV17, RV19
Green - G40, G43, G46
Orange - YR04, YR68, YR07

And that's all from me for this post folks! Thanks for stopping by! 

Sketch Saturday Challenge #307 with Milk Coffee

Good Saturday Morning and welcome to another Sketch Saturday challenge. This week we are sponsored once again by the fabulous Milk Coffee.


Our prize this week is 5 digis from the Milk Coffee Etsy store!

Sketch #307 was designed by me!


And here's my take on it. I rotated the sketch and then went for something completely different and saw each of those strips as sunflowers with my digi image, Lisabeth loves Sunflowers being one of the strips as well. I wanted it to look like she was in a garden of tall sunflowers and totally love how this one came out! 


Recipe:

Stamps: Lisabeth Loves Sunflower from Milk Coffee, Daydreamer, Flower Fusion #9 both from Papertrey 
Ink

Papers: So Saffron, Chocolate Chip, Whisper White all from Stampin' Up, Copic X-Press It Blending Card

Inks: So Saffron, Chocolate Chip, Early Espresso, Old Olive all from Stampin' Up, Copic Markers

Accessories: Flower Fusion #9 Die from Papertrey Ink

Copics Used:
Skin - E000, E00, E01, R20, R30
Hair - E23, E25, E27, E29
Dress, Shoes & Hairband - B60, B63, B66
Leaves & Stem - YG91, YG93, YG95
Flower - Y113, Y15, Y17, E59, E57, E55

And that's all from me for this post folks! Thanks for stopping by and don't forget to pop on over to the Sketch Saturday Challenge blog and see all the other fantastic DT cards and join in the fun too!

My Glamorous Bestie

This week's challenge on the new look My Besties UK challenge blog is called Hollywood Glamour and I had the perfect image for this one! This card is also for My Besties Aussie Challenge #21 to make a card with more than one fold. I made a pop up book card using the instructions from my fellow Fussy and Fancy girl Norma. These instructions were so easy to follow and made such a great card.

Here's the outside with my glamorous Bestie...


And here's the inside...


Recipe:

Stamps: My Besties IMG031 from Sherri Baldy, Signature Greetings II, Mat Stack Collection 2 both from Papertrey Ink

Papers: Crumb Cake, Early Espresso Coredinations, Whisper White, Champagne Glimmer Paper all from Stampin' Up, All Dolled Up Patterned Papers from Glitz, Copic X-Press It Blending Card

Inks: Pretty in Pink (Retired), Early Espresso both from Stampin' Up, Copic Markers, Golden Star Gelly Roll Pen

Accessories: Pretty in Pink Satin Ribbon (Retired) from Stampin' Up, Filigree Corner Die frm La-La Land Crafts, Filigree Border Die, Beautiful Blooms II Dies #3 both from Papertrey Ink, Die-Namics Fancy Flourish Die from MFT, Fancy OvalDies and Oval Nestabilities, Circle Nestabilities all from Spellbinders

Copics Used: 
Skin - E000, E00, E01, R20, R30
Hair - E23, E27, E29
Eyes - E23, E25
Cigarette Holder - E23, E29
Dress - RV10, RV11, RV13, RV14
Flowers - RV10, RV11

And that's all from me for today folks! Thanks for stopping by.

Isobel the Petal Fairy

This week's challenge from Crafty Sentiments is one I kept putting off all week as I just didn't know how I was going to do it, but today inspiration hit me and I got straight on it this morning and totally love how this card came out in the end! I generally don't do all white cards and was convinced I would have to go CAS, which just isn't my style. This morning, however, I remembered I had some beautiful white foiled DSP and some vellum and went for those.

And here's my card. My vellum actually has silver hearts printed on it, but they all seem to have hidden behind my oval frame LOL.


Recipe:

Stamps: Isobel - Petal Fairy from Crafty Sentiments

Papers: Whisper White, Bride DSP (Retired), Silver Foil Vellum all from Stampin' Up, Copic X-Press It Blending Card, Card Base from Crafts Unlimited

Inks: Memento Tuxedo Black, Copic Markers

Accessories: Whisper White Stitched Grosgrain Ribbon from Stampin' Up, Pearl Brads from Papermania, Flowers from Wild Orchid Crafts, Frosted Lace Stickles, Anja's Squares Dies LR0242 from Marianne Creatables, Oval and Scalloped Oval Nestabilities both from Spellbinders

Copics Used:
Skin - E000, E00, E21, E11, E04, R20
Hair - E21, E25, E29
Skirt & Shoes - RV10, RV11, RV13
Petals - RV000, RV00, RV02
Socks & Vest - C00, C1, C2
Basket - E31, E33, E35

And that's all from me for this post folks! Thanks for stopping by.


Pixie Nerd Colour Along

Alyce Keegan did a Colour Along last week using Saturated Canary's Pixie Nerd and I finally got round today to doing it before the video gets taken off her site (which has happened to me the last 2 times I've tried to do one! Sometimes I don't have the images printed and have no printer at home to do so or I just don't get the time! This time I was waiting for my reinkers to turn up as I had 2 pens that had run out.)

Anyway I thought I would enter this card into Fussy And Fancy's Challenge #112 to use lace and pearls to support my fellow Fussy and Fanciers! It's not too bad for my first colour along, although I do think the dress has too much yellow in it, but I do like it! I don't own any watercolours so didn't do the background part and coloured in the ground and did a slight shadow around her instead.


Recipe:

Stamps: Pixie Nerd from Saturated Canary

Papers: Rich Razzleberry from Stampin' Up, Copic X-Press It Blending Card, Card base from Crafts Unlimited, Vintage Frost Basics 19th December from Maja Design, Other patterned paper from Live & Love Crafts but I've cut the label off it so no idea who it is by!

Inks: Copic Markers, Golden Star Gelly Roll Pen

Accessories: Rich Razzleberry Taffeta Ribbon from Stampin' Up, Flowers from The Range and Wild Orchid Crafts, Jumbo Crochet Trim, Pearls both from Papermania

Copics Used:
Skin - E000, E00, E21, E11, E04, R20
Hair & Dress - BV20, BV23, BV25, BV29, R81, Y21
Backpack & Blue books - B91, B93, B95, B97, B99
Shoes/Wings - RV10, RV34, R85, R89
Brown books - E11, E13, E18
Ground - W1, W3, W5

And that's all from me for today folks! Thanks for stopping by.

Starry Birthday

Oh what a difficult card this one turned out to be. I had no end of Copic issues with this one! Pens running out, pens going sticky, blending not blending properly, pleats not pleating, flicks not flicking properly! I wish I had printed more than one copy of this image and then I could have started again but now it has dried and been put together it doesn't actually look all that bad (I hope!). I will be investing in a good quality printer when we get round to moving but at the minute I have no room for one and the one at work is just much better than I can afford to buy. Shame I'm not back at work until Tuesday!

Anyway this card is for the Tiddly Inks Challenge #131 Celebrate and for The Ribbon Girl Colour Challenge for this month to use yellow. I did add some brown in it too to break it up a bit as totally yellow cards are not something I'm completely comfortable making!

And here's my Starry Birthday...


Recipe:

Stamps: Starry Birthday from Tiddly Inks, Wishing You from Verve Stamps

Papers: Daffodil Delight, Soft Suede, Gingham Garden DSP, Brights DSP Stack (Retired) all from Stampin' Up, Copic X-Press It Blending Card

Inks: Daffodil Delight from Stampin' Up

Accessories: Daffodil Delight Satin Ribbon (Retired) from Stampin' Up, Medium Scallop Border Die from Papertrey Ink, White Opal Liquid Pearls

Copics Used:
Skin - E000, E00, E21, E11, R20
Hair - Y21, Y23, Y26, Y28
Shirt & Shoes - E55, E57, E59
Bow & Top Balloon - Y13, Y15, Y17
T-shirt & Other 2 Balloons - Y11, Y13, Y15
Ground - E40, E41, E42

And that's all from me for this post folks! Thanks for stopping by!

Blossom Breeze

I love this image by Art by MiRan and just had to use her today for the latest Art by MiRan Challenge #4 Anything Goes. I just love her gorgeous long hair and beautiful dress - reminds me of what an elven princess should look like! This card is also for Totally Gorjuss' Challenge #232 to use die cuts and punches and for In The Pink's Challenge #42 to use a digi stamp image.

And here she is...I added a few die cut flowers and then lots of punched flowers to add to the Blossom Breeze!


Recipe:

Stamps: Blossom Breeze from Art By MiRan

Papers: Pretty in Pink (Retired), Rich Razzleberry both from Stampin' Up, Copic X-Press It Blending Card, Bird Song Patterned Papers from First Edition

Inks: Copic Markers, Clear Star Gelly Roll Pen, Clear Glaze Pen

Accessories: Beautiful Blooms II Dies #3, Little Bitty Bird Additions Dies, Heart Border Die all from Papertrey Ink, Bitty Punch Pack, Rich Razzleberry Polka Dot Ribbon (Retired) both from Stampin' Up, Heart Embossing Folder from Crafts Too (I think!), Gems from stash, Doily from Dovecraft

Copics Used: 
Skin - E000, E00, E01, R20, R30
Hair - E42, E43, E44
Dress - R81, R83, R85
Dark Red - R56, R59
Pink Flowers - R21, R11
Leaves & Eyes - G94, G99

And that's all from me for today folks! Thanks for stopping by.

Mary had a Little Lamb

I totally love this image from Wee Stamps and thought I would use it for a last Easter card. I always seem to print these Wee Stamps images too big for some unknown reason so they take up most of the card. Need to learn to get the sizing right and play around with them before actually printing onto my Copic card.

Anyway this card is for Whimsy Stamps' Challenge #70 Anything Goes and for Papertake Weekly's Challenge Happy Easter. And here she is...


I attempted to colour the lamb in with lots of little dots and furry swirls and I really like how it came out. Not perfect yet, but getting there! 

Recipe:

Stamps: Mary from Wee Stamps, Compact Sentiments Part 1 from Waltzing Mouse Stamps

Papers: So Saffron, Ballet Blue(Retired), Whisper White, Bashful Blue Prints DSP (Retired), So Saffron Prints DSP (Retired) all from Stampin' Up, Copic X-Press It Blending Card

Inks: So Saffron from Stampin' Up, Copic Markers, Silver Star Gelly Roll Pen

Accessories: Beautiful Blooms II Dies #3 from Papertrey Ink, Buttons from The Works

Copics Used:
Skin - E000, E00, E01 R20, R30
Hair  - YR31, Y21, YR21, Y26
Flowers - Y21, YR31, Y26
Hat - E31, E33, E35, E37
Boots - E55, E57, E59
Blues - B32, B34, B37
Crook - E42, E43, E44
Grass - G40, G43, G46
Greys - W1, W3, W5

And that's all from me for this post folks! Thanks for stopping by.

Sketch Saturday Challenge #306 with A Day for Daisies

Good morning everyone and welcome back to another fabulous sketch from the Sketch Saturday challenge blog!

A Day For Daisies is back this week to sponsor us for this week's challenge #306! 
The prize this week is a $12 A Day for Daisies gift certificate.

Sketch #306 was design by Debra


And here is my reasonably CAS card using the My Tower digi from A Day For Daisies. Isn't she just adorable?!


Recipe:

Stamps: My Tower from A Day For Daisies, Asian Fusion from Papertrey Ink

Papers: Crisp Cantaloupe, Baked Brown Sugar, Sweet Sorbet DSP all from Stampin' Up

Inks: Crisp Cantaloupe from Stampin' Up, Copic Markers, Golden Star Gelly Roll Pen

Accessories: Baked Brown Sugar Stretch Ruffle Trim, In Color Boutique Details both from Stampin' Up

Copics Used:
Skin - E000, E00, E01, R20
Hair - E41, E42, E43, E44
Wall - W1, W3, W5
Dress & Butterflies - YR00, YR02, YR61

And that's all from me for this post folks! Thanks for stopping by and don't forget to pop on over to the Sketch Saturday Challenge blog and check out all the other gorgeous DT creations and join in the fun whilst you're there too. 

Carefree Elise

I recently bought some Make It Crafty digis with the discount you get from Alyce Keegan's Skin and Hair Colouring class that I signed up for (and haven't done very much of to be honest. Still waiting on some reinkers to arrive so I can carry on with them!) and thought I would enter their challenge with one of my new stamps today. Their challenge #8 is split into 2 halves - an easy colour challenge to use turquoise and purple and a more difficult one. I went for the easy option, mostly because I don't have a printer at home so couldn't print out the digi I wanted to use on some other paper.

And here's my card using Carefree Elise. Such a pretty image!


Recipe:

Stamps: Carefree Elise from Make It Crafty, Flower Fusion #8, Mini Blooms both from Papertrey Ink

Papers: Tempting Turquoise, Elegant Eggplant, Regals DSP Stack (Retired), Pink Flamingo DSP (Retired) all from Stampin' Up, Copic X-Press It Blending Card

Inks: Tempting Turquoise, Elegant Eggplant both from Stampin' Up, Copic Markers

Accessories: Elegant Eggplant Polka Dot Ribbon (Retired?) from Stampin' Up, Filigree Corner Die from La-La Land Crafts, Die-Namics Double Scalloped Border Die from MFT, Tag 2 Die from Crafty Sentiments, Gems from The Works, Flowers from Wild Orchid Crafts & Hobbycraft

Copics Used:
Skin - E50, E51, E53, R20
Hair -E42, E43, E44
Turqouise - BG01, BG05, BG07
Purple - BV11, BV13, BV17
Ground - E40, E41, E42

And that's all from me for today folks! Thanks for stopping by.

Fairy Nuff

It's time for another challenge #25 at The Stamping Chef and another Anything Goes one. I love these ones as they take no thinking! LOL And whilst I'm on holiday from work I don't want to be doing too much thinking! This card is also for Color Throwdown's Challenge #288 to use this bright combo and for Creative Inspirations Challenge #261 to use lots of layers.

Just adding in a quick thank you to both The Stamping Chef and Creative Inspirations Design Teams for choosing my card last week to be a winner for their challenges.


And here's my card. I attempted to do green hair and although it's not a perfect match for the Gumball Green papers, it's not too far off and I actually really like it! You can't really tell in the photo, but I covered her wings with glamour dust and they have just the right amount of sparkle!


Recipe:

Stamps: Fairy Nuff from The Stamping Chef, Fairy Certain Sentiment from Kith and Kin

Papers: Melon Mambo, Basic Gray, Cheerful Treat DSP (Retired), In Colors 2012-14 DSP Stack all from Stampin' Up, White card for sentiment from work (no idea what brand!), Copic X-Press It Blending Card

Inks: Copic Markers

Accessories: Melon Mambo Tafetta Ribbon from Stampin' Up, Die-Namics Dainty Lace Border and Oval Dainty Dies both from MFT, Corner Die from Marianne Creatables, Paper Flowers from Wild Orchid Crafts, Glamour Dust

Copics Used: 
Skin - E50, E51, E53, R20
Hair-G00, G02, G05, G07
Wings - G000, G00, G02
Eyes  - G05, G07
Outfit - RV21, RV23, RV25, RV29
Ribbon and Belt - C1, C3, C5

And that's all from me for today folks! Thanks for stopping by!

All Dressed Up In Pastels

All Dressed Up's Challenge #13 this week is Spring and can be either Spring colours or flowers, so I used both. I also used Sketch and Stash's Challenge #137 for the layout. Most of my stash is reasonably new except for the butterfly stamp set which was one of my first purchases from Papertrey Ink about 5 years ago and one I always go back to as it's such a perfect butterfly set!


And here's my take on this sketch...The yellow looks a lot bright than it is in real life. It's much softer, but the light wasn't great when I took my photo and this is the best I can get out of it for now until I can take another one in the daytime tomorrow.


The flourishes under the butterflies was a trick I found on the internet yesterday and yet it is so simple I have no idea why I have never heard about it before! Stamp your flourishes in Versamark ink then add Liquid Pearl or glitter dots for a perfectly shaped flourish! Simples! My own flourishes always go wonky and never curl properly - ingenious idea!

Recipe:

Stamps: Party Girl 02 from All Dressed Up, Mini Blooms, Butterfly Dreams, Fancy Flourishes all from Papertrey Ink

Papers: Crisp Cantaloupe, Pistachio Pudding, Whisper White, Subtles DSP Stack (Retired), In Colors 2013-15 DSP Stack all from Stampin' Up, Copic X-Press It Blending Card

Inks: Crisp Cantaloupe, Pistachio Pudding, So Saffron all from Stampin' Up, Copic Markers, Versamark

Accessories: Crisp Cantaloupe Stretch Ruffle Trim from Stampin' Up, White Opal Liquid Pearls, Circle  and Scalloped Circle Nestabilities both from Spellbinders

Copics Used:
Skin - E50, E51, E53, R20
Hair - Y11, YR31 Y21, E55
Peach - YR00, YR61, YR02
Green - G40, G43

And that's all from me for this post folks! Thanks for stopping by.

The Paper Shelter Challenge #154 Spring Is Here

It's time for another The Paper Shelter challenge today and have we got a good one for you this week - Spring Is Here and yes it surely is. The weather is much warmer here in the UK and don't need my thick winter coat any more when I go out and some days I don't even need a coat at all! I just love the warmer weather - makes me so much happier!


Anyway on to the challenge...I used the cute Spring Elves for this one and it did take a while to colour in as there's so many different elements to it, but I had lots of fun doing so.


And don't forget the fabulous prize that is on offer this week as well...


I'm also entering this into A Random Fan's Challenge #6 to use pastel colours.

Recipe:

Stamps: Spring Elves from The Paper Shelter

Papers: Rose Red, Pear Pizzazz, Springtime Vintage DSP (Retired) all from Stampin' Up, Copic X-Press It Blending Card

Inks: Copic Markers

Accessories: Rose Red Stitched Grosgrain Ribbon (Retired), Happy Birthday Die from Joy Crafts, Pippi Butterfly, Isabella Butterfly Dies both from Memory Box, Pearls from Hobbycraft, Paper Flowers from Wild Orchid Crafts

Copics Used: 
Skin - E50, E51, E53, R30
Sack & Cart - E55, E57, E59
Blond Hair - YR21, YR23, Y28
Yellow T-Shirt & Watering Can -Y15, Y17
Dark Red Flowers -R56, R59
Light Pink Flowers - R81, R83
Green Hat & Trousers - G40, G43, G46
Blue Waistcoat & Shorts - B32, B34, B37
Brown Hair & Tool Handles - E35, E37
Red T-Shirt, Band & Shoes - R24, R27, R29
Orange Hat - YR15, YR16, YR18
Leaves - G28, YG67
Bush & Grass - YG23, YG25, YG17
Tools - W3, W5
Clouds - C1, C2, C3
Sky - BG10, BG11, BG000

Boy that's a lot of Copics! And that's all for me for this post folks! Thanks for stopping by and don't forget to pop on over to The Paper Shelter blog and have a look at all the fabulous cards from the DT and join in the fun too!

Bubbles' Bath

I missed out on the freebie image to join in with Lacy Sunshine's Facebook challenge this fortnight as I wasn't paying much attention to FB early last week as I was full of cold yet again. I seem to get one at the beginning of every holiday as my body is slowly starting to wind down from the chaos that is always work before we break up! Luckily for me I had one of the images anyway, so I'm using this card to join in with the challenge! I'm also entering it into Lacy Sunshine's Challenge #31 to make a feminine card, which immediately calls for me to use pink!

And here's Bubbles in her flowery bath. Love this image!


Recipe:

Stamps: Bubbles Bath from Lacy Sunshine, Scrolling Script from Papertrey Ink

Papers: Regal Rose (Retired), Soft Sky, Whisper White, Subtles DSP Stack (Retired), Soft Sky Prints DSP (Retired) all from Stampin' Up, Copic X-Press It Blending Card

Inks: Regal Rose (Retired), Soft Sky both from Stampin' Up, Copic Markers, Sakura Glaze Pen

Accessories: Regal Rose Ribbon (Retired), Corner Rounder Punch, Sizzix Beautiful Wings Embosslits all from Stampin' Up, Double Loop Punch Around The Page set from Martha Stewart, Pearls from Hobbycraft, Doily from Dovecraft, Precious Hearts Dies from Memory Box, Corner Die 6002/0148 from Marianne Creatables

Copics Used:
Skin - E50, E51, E53, R20, R30
Hair & Eyes - E42, E43, E44, E47
Stem - G21, G11
Flower & Hairband - R81, R83, R85
Bubbles - BG10, BG11, BG13
Shadow/Glow - BG10, BG11

And that's all from me for today folks! Thanks for stopping by!

Scene It Sunday #180 Featuring Fore You from Di's Digi Stamps

Good morning and welcome to this week's Scene It Sunday. This week I have used this cute golfing mice image from Di's Digi Stamps, ...