Showing posts with label Stampin' Up. Show all posts

The Paper Shelter Christmas Break Challenge Anything Goes

Good morning everyone and welcome to the Paper Shelter's final challenge of 2019! It's incredible how fast this past year has gone by! Did you all enjoy our birthday blog hop for the last challenge as well? Keep an eye out for the winners' announcements coming very soon!

Anyway, onto my card for this challenge. It's an Anything Goes challenge, always a very popular one, and I decided to squeeze in another Christmas card for my stash! This adorable image is Gingerbread House and I just love the cute gingerbread man decorating his own house. We have tried many times to make a gingerbread house from one of those kits you can buy, but it never works. The icing just doesn't stick anything together and it all just collapses! I think I'll just stick with colouring them instead!


Recipe:

Stamps: Gingerbread House from The Paper Shelter, Yummy Christmas from Stampin' Up

Papers: Crumb Cake, Early Espresso & Candy Cane Lane DSP (Retired) all from Stampin' Up

Inks: Real Red from Stampin' Up, Copic Markers, Pearlescent Chalks from Pebbles Inc.

Accessories: Cherry Cobbler Ribbon (Retired) from Stampin' Up, Diamond Stickles

Copics Used:
Gingerbread - E31, E33, E35, E37
Frosting - R000, R00, R01
Red - R35, R37, R39
Green - G14, G19, G17
Black - C7, C9
Door Knob - Y15, Y19

And that's all from me for this post folks! Thanks for stopping by and don't forget to pop on over to the Paper Shelter Challenge blog and check out all the other fabulous creations for this final challenge of the year and why not join in the fun whilst you are there?! As always there are some fantastic prizes to be won!

The gift voucher

The Paper Shelter 9th Birthday Celebration Blog Hop

Good Morning fellow crafters and welcome to The Paper Shelter Blog Hop and this is in celebration of their reaching their 9th Birthday on December 8th. It will be a two week Challenge and both Design Teams are taking part.


The hop is our way of inviting you to join in with us and this one is a "BIRTHDAY/ CELEBRATIONS" theme, which I know is always popular! If you have landed here from Patsy's blog then you're heading in the right direction - if not then you'll want to head on back to The Paper Shelter Challenge Blog to start again, as you won't want to miss out on this one! 

Our Design Teams have worked very hard and are showcasing the gorgeous images available from The Paper Shelter website Each blog on the hop is offering one lucky commentor a digi of their choice as well as the main prize, details of which are on The Paper Shelter Challenge Blog.

And here's my card using the adorable Santa Selfie. I just had to use him for this bloghop to celebrate the fun of Christmas.


Recipe:

Stamps: Santa Selfie from The Paper Shelter, Yummy Christmas from Stampin' Up

Papers:
Real Red, Early Espresso & Candy Cane Lane DSP (Retired) all from Stampin' Up, Copic X-Press It Blending Card

Inks: Real Red from Stampin' Up, Copic Markers

Accessories: Whisper White Ribbon (Retired) from Stampin' Up, White Fluffy Stuff from Woodware

Copics Used:
Skin - E000, E00, E21, E11, E04, R20, R30
Red - R35, R37, R39
Beard & Moustache - C00, C1
Belt, Boots & Gloves - C5, C7, C9
Buckle - Y21, Y23, Y26
Phone - C0, C2, C4
Rudolph - E30, E31, E34, E33, E35, E39, E37
Ground - E70, E71, E74

From here you will need to hop on over to Natascha's blog. Don't forget to leave your comment for a chance of winning your choice of one of the fab digi's available in store.

Hop! Hop! Hop! Good luck and hope you're enjoying it so far.

LeAnn's World 101 Challenge #21 Anything Goes

Good morning and welcome to my first official challenge as part of the LeAnn's World 101 Design Team. Our challenge this month is an Anything Goes challenge which is always a popular one.

I used the gorgeous Christmas Girl With Tree for my card to add another Christmas card to my ever increasing pile. I seem to keep adding people to my Christmas card list, so need more and more! I think I may run out of time before I get them all made though!

This card is also for

Recipe:

Stamps: Christmas Girl With Tree from LeAnn's World 101, Yummy Christmas from Stampin' Up

Papers: Real Red & Garden Green both from Stampin' Up, Patterned Papers from stash (can't remember their name!), Make It Colour Blending Card from Make It Crafty

Inks: Real Red from Stampin' Up, Copic Markers, Clear Star Gelly Roll Pen

Accessories: Ribbon from Stash, Gems from Poundland, Diamond Stickles

Copics Used:
Skin - E000, E00, E21, E11, E04, R20, R30
Hair - E53, E55, E57, E59
Eyes -  G43, G46
Shorts & Bow - G03, G05, G07
Hat, Dress & Boots - R32, R35, R37, R39
Tree - G85, G94, G99, R35, R37, Y15, Y19, B16, B18, E44, E47
Ground - W1, W2, W3

And that's all from me for this post folks! Thanks for stopping by and don't forget to pop on over to the LeAnn's World 101 Challenge blog and check out all the other fabulous creations from the rest of the DT and why not join in the fun whilst you are there?!

Little Miss Muffet Stamps Inspiration Post

Good morning everyone. Did you see the announcement that Barbara made last week about closing the store? It's a real shame as that means the design team will close too, but I completely understand that she needs a break at the moment. Hopefully one day Little Miss Muffet Stamps will return. The DT are still sharing our projects at the minute and here is my latest one.

I have used the adorable Jr. Hatter Shower for this one (she was a digi stamp so is now retired) and made it into an anniversary card for my boyfriend as we celebrated our 22nd year together earlier this week.


Recipe:

Stamps: Jr. Hatter Shower from Little Miss Muffet Stamps, Labeler Alphabet from Stampin' Up

Papers: Bermuda Bay, Real Red, More Amore DSP (Retired) & Fresh Prints DSP (Retired) all from Stampin' Up, Make It Colour Blending Card from Make It Crafty

Inks: Bermuda Bay & Real Red both from Stampin' Up, Copic Markers, Clear Star Gelly Roll Pen

Accessories: Bermuda Bay Ribbon (Retired) from Stampin' Up,

Copics Used:
Skin - E000, E00, E21, E11, E04, R20, R30
Hair - E50, E51, E53, E55
Red - R35, R37, R39
Teal - BG53, BG45, BG57, BG49
Hat - E42, E43, E44
Hose - T2, T4, T6, G40, G43, G46
Leaf - G14, G17, G19
Water Droplets - FBG2, BG45
Grass - BG93, BG96, BG99

And that's all from me for this post folks! Thanks for stopping by!

Wishing You Everything On Your List...

Good morning and welcome to another Christmas card post of mine! I have bought so many new Christmas themed stamps this year and, like most crafters I bet, I haven't used all of them yet! I may make a few more ready for next year as I found a box with about 7 in that I made last year or at the beginning of this year, so that saved me some time. I do love making Christmas cards and you never know how many you will need to send out, so best to have a small stash built up just in case you get caught short!

This card uses the cute Signs of Santa from Stampin' Up, but with Mr and Mrs Claus this time, not just the elves which I used on a previous card here. I used some of my old retired papers as well and this set, called Merry Moments, is almost finished up! Once I no longer have any pieces big enough to do anything worthwhile with, I throw the leftovers away!


Recipe:

Stamps: Signs of Santa from Stampin' Up

Papers: Real Red, Old Olive, Whisper White, Merry Moments DSP (Retired) all from Stampin' Up, Make It Colour Blending Card from Make It Crafty

Inks: Old Olive from Stampin' Up, Memento Tuxedo Black, Copic Markers, Clear Star Gelly Roll Pen, Tumbled Glass Distress Oxide Ink from Tim Holtz

Accessories: Old Olive Satin Ribbon (Retired) from Stampin' Up, Crystal Stickles, Aspen Snowflake Punch Around The Page Set from Martha Stewart, Mini Cloud Edges Stencil from MFT

Copics Used:
Skin - E000, E00, E21, E11, E04, R20, R30
Mrs Claus' Hair - W00, W1, W2
Santa's Beard & Moustache - C0, C1, C2
Red - R35, R37, R39
Green - G05, G07, G09
Holly - R56, G16, G19
Apron - C0, C1
List - E40, E41, E42
Sign - E55, E57, E59
Cart - E07, E08, E09, C5, C7, C9, C10

And that's all from me for this post folks! Thanks for stopping by and see you all again soon! 

Have A Merry (Go Round) Christmas

Good morning and welcome to another Christmassy post from me. No idea how many Christmas cards I have made so far and no idea if I have enough, but my MIL usually has some from me as well, so I'm just gonna keep making 'em until Christmas arrives! Might get to use some of the stamps I have been buying recently then!

Today I am using the cute little elves from Stampin' Up's Signs of Santa set and came up with this idea of make a circular spinner card when I pulled out the sentiment stamp and got merry-go-round in my head from it! The things that inspire us! 😜 The snowflakes move round (with a bit of persuasion) and the elves are supposed to be dancing round the outside! Quite a simple, but fun card!

This card is also for

Recipe:

Stamps: Signs of Santa & Merry Little Christmas both from Stampin' Up

Papers: Real Red, Old Olive, Whisper White & Merry Moments DSP (Retired), Make It Colour Blending Card from Make It Crafty

Inks: Real Red from Stampin' Up, Copic Markers, Golden Star Gelly Roll Pen

Accessories: Real Red Ribbon (Retired) from Stampin' Up, Slip 'n' Slide Dies from Whimsy Stamps, Snowflake Punch Die from Marianne Designs, Crystal Stickles, Spin & Slide Discs from My Favorite Things 

Copics Used:
Skin - E000, E00, E21, E11, E04, R20, R30
Hair - E15, E18
Red - R35, R37, R39
Green - G05, G07, G09

And that's all from me for this post folks! Thanks for stopping by! 

Little Miss Muffet Stamps Inspiration Post

Good morning and welcome to my Little Miss Muffet Stamps Inspiration post for this week. Now's it's November and Hallowe'en is all done 😥 I need to start making some more Christmas cards and I tend to run out! I used the adorable Jr Hatter Holly, who comes with 3 different images on her stocking. I chose to use the presents one for this card.


For a change I thought I would make an easel card - not done one for ages! But love being able to use a larger image and still being able to add a sentiment to it! 

And here is a close up (and a better photo - my phone camera can be awkward at times like on the full photo!) of my image.

This card is also for

Recipe:

Stamps: Jr. Hatter Holly from Little Miss Muffet Stamps, Merry Little Christmas from Stampin' Up

Papers: Real Red, Old Olive & Jolly Holiday DSP (Retired) all from Stampin' Up, Make It Colour Card from Make It Crafty

Inks: Old Olive from Stampin' Up, Copic Markers

Accessories: Old Olive Ribbon (Retired) from Stampin' Up, Gems from Poundland, White Liquid Applique

Copics Used:
Skin - E000, E00, E21, E11, E04, R20, R30
Hair - Y21, Y23, Y26, E35
Red - R35, R37, R39
Gold - Y21, Y23, Y26, Y28
Dark Green - G82, G28, G29
Bright Green - G05, G07, G09
Ground - W3, W4, W5
Background - G0000, G000, G00

And that's all from me for this post folks! Thanks for stopping by and don't forget to pop on over to the Little Miss Muffet Stamps Challenge Blog and check out all the other fabulous creations from the DT this month and why not join in the challenge whilst you are there too?! You can also pop over to the Little Miss Muffet Stamps and Inspiration group on Facebook and share your creations there too! 

Little Miss Muffet Stamps Inspiration Post

Good morning and welcome to my inspiration post for Little Miss Muffet Stamps this week. Today I am sharing a card using a technique that I haven't done in absolutely ages - masking and inking. This technique is so easy (kinda!) to do, yet I never seem to do it. I used the gorgeous Lydia's Wolf Cub digi stamp, flipped one so they were side by side, then masked the wolves to colour the sky in Squeezed Lemonade Distress Oxide ink.

I then masked the moon and wolves to colour the sky and grass. I swear I had the grassy edges stencil from MFT to do the grass, but instead found 2 of the hills and drifts stencil so I reckon I have got muddled up there as the grassy edges was nowhere to be found. Need to add that one to my shopping list I guess! I used my clouds stencil to add some clouds over the moon and sky as well, but they didn't quite come out as I intended. Think this is definitely a technique I need to practise!

This card is also for

Recipe:

Stamps: Lydia's Wolf Cub from Little Miss Muffet Stamps, Graveyard Gate from Stampin' Up

Papers: Basic Black from Stampin' Up, Super Smooth Card from That Craft Place, Patterned Paper from Doodlebug, Card blank from Create and Craft

Inks: Memento Tuxedo Black, Copic Markers, Distress Oxide Inks in Squeezed Lemonade, Dusty Concord, Wilted Violet, Stormy Sky, Blueprint Sketch, Distress Ink in Evergreen Bough

Accessories: Alphabet & Numbers Die 6002/0141 from Joy Crafts, Mini Cloud Edges Stencil from MFT

Copics Used:
Wolves - W00, W1, W2, W3, W5, W6, W9, R20, R30

And that's all from me for this post folks! Thanks for stopping by and don't forget to pop on over to the Little Miss Muffet Stamps challenge blog and join in this fortnight's challenge or pop on over to the Little Miss Muffet Stamps and Inspiration Group on Facebook to see lots more fabulous creations from the rest of the DT.

Little Miss Muffet Stamps Inspiration Post - Polka Dot Pals Petunia

Good morning! Apologies that this post is late this week, but I have had a personal problem going on this week and I didn't have any crafting time during the week as I had planned originally, but I am now catching up on everything!

For this week's inspiration post for Little Miss Muffet Stamps, I have used the adorable Polka Dot Pals Petunia for this card, using some of my favourite colours to colour her up! I couldn't find a sentiment in my huge pile of stamps that had this sentiment (I am sure I have one somewhere though!), so I used an alphabet stamp to spell it out instead and actual think I prefer it this way!

This card is also for

Recipe:

Stamps: Polka Dot Pals Petunia from Little Miss Muffet Stamps, Labeler Alphabet from Stampin' Up

Papers: Crumb Cake & Fresh Prints DSP (Retired) both from Stampin' Up, Super Smooth card from That Craft Place, Card blank from stash

Inks: Real Red & Coastal Cabana both from Stampin' Up, Copic Markers

Accessories: Real Red Ribbon (Retired) from Stampin' Up, Stars Edge Punch from Martha Stewart, Flowers & Stamens all from Wild Orchid Crafts

Copics Used:
Skin - E000, E00, E21, E11, E04, R20, R30
Hair - E42, E43, E44, E47
Dress - BG53, BG45, BG57, BG49
Apron - E41, E42, E43, E44, R37
Red - R32, R35, R37, R39
Necklace - T4, T6

And that's all from me for this post folks! Thanks for stopping by and don't forget to pop on over to the Little Miss Muffet Stamps and Inspiration group on Facebook and check out all the other fabulous creations from the rest of the DT for this week and why not join in our Anything Goes challenge on the blog as well?!

Ching-Chou Kuik Challenge - Pearls or Gems

Good morning and welcome to my post for the monthly challenge from Ching-Chou Kuik Stamps and Inspiration blog. This month our challenge is for you to add pearls or gems to your project.

For this card I used the gorgeous Keep In Faith and went with a yellow and green colour combo. Not a colour combo I would usually go for, but one which works really well with the sunflowers in this digital stamp.

This card is also for

Recipe:

Stamps: Keep in Faith from Ching-Chou Kuik, Sunshine and Rainbows from Stampin' Up

Papers: Daffodil Delight, Pear Pizzazz & Greenhouse Gala DSP (Retired) all from Stampin' Up, Super Smooth Card from That Craft Place

Inks: Daffodil Delight from Stampin' Up, Copic Markers

Accessories: Daffodil Delight Ribbon (Retired) & Lucky Limeade Baker's Twine (Retired) both from Stampin' Up, Charm & Pearls both from stash, Rectangle & Scalloped Rectangle Nestabilities both from Spellbinders, Sunflower Die 6002/0452 from Joy Crafts

Copics Used:
Skin - E000, E00, E21, E11, E04, R20, R30
Hair - YG61, YG63, YG67, YG99
Eyes - E43, E44, E47
Lips - R20, R30
Flower Petals - Y32, Y35, Y38
Flower Centres & Twigs - E44, E47, E49

And that's all from me for this post folks! Thanks for stopping by and don't forget to pop on over to the Ching-Chou Kuik Inspiration and Challenge blog and check out all the other fabulous cards from the DT and why not join in the fun whilst you are there too?! As always there are some fantastic prizes to be won! 

Little Miss Muffet Stamps Inspiration Post

Good morning everyone and welcome to my inspiration post for Little Miss Muffet Stamps this week. Today I am using the adorable Jr Hatter Kathrina. Love these hatter images with all their different hats!

I actually coloured her up before deciding on my patterned papers and the pinky-peach looked so much more pink without any background papers, but as soon as I tired to find a pink that would match, the orange tones came out more and none of my trillions of pink papers matched at all. In the end, I found these peachy-melon papers which worked so much better!

This card is also for

Recipe:

Stamps: Jr. Hatter Kathrina from Little Miss Muffet Stamps, You Little Furball from Stampin' Up

Papers: Crisp Cantaloupe, Smoky Slate, Sweet Sorbet DSP (Retired) & Carried Away DSP all from Stampin' Up, Super Smooth Card from That Craft Place

Inks: Smoky Slate from Stampin' Up, Copic Markers

Accessories: Ribbon from Craft Creations, Paw Print Dies from Paper Smooches, Cats Dies 1201/0001 from Joy Crafts, Label 2 Shape Art from Dutch Doobadoo

Copics Used:
Skin - E000, E00, E21, E11, E04, R20, R30
Hair - C3, C5, C7, C9
Pink - R11, R20, R21
Hat & Skirt - C0, C1, C3, C5
Cat Face - C3, C5, C7
Cat nose - C7, C9
Pompoms - C0, C1, C3

And that's all from me for this post folks! Thanks for stopping by and don't forget to join in the Little Miss Muffet Stamps Challenge this fortnight!

Little Miss Muffet Challenge #187 Anything Goes

Good morning and welcome to my DT post for the new challenge from Little Miss Muffet Stamps. As always the challenge is Anything Goes and we would love to see your creations using Little Miss Muffet Stamps, although you don't have to. Have a look in the store and you will find an amazing range of stamps, rubber and digi, to suit everyone!

I used the adorable Polka Dot Pals Dakota for this one. I don't have any police themed sentiments or anything that could really be used other than generic ones, so used one of my alphabet stamp sets to create the stop right there! sentiment as I thought it was something the police would probably say!

This card is also for

Recipe:

Stamps: Polka Dot Pals Dakota from Little Miss Muffet Stamps, Back to Basics Alphabet from Stampin' Up, Birthday Bash Sentiments from Papertrey Ink

Papers: Smoky Slate & Night of Navy both from Stampin' Up, Just for Men Patterned Papers from Crafter's Companions, Pack Bench Patterned Papers from Fancy Pants, Super Smooth Card from That Craft Place

Inks: Night of Navy from Stampin' Up, Copic Markers, Silver and Clear Wink of Stella Pens

Accessories: Nesting Star Dies from X-Cut

Copics Used:
Skin - E000, E00, E21, E11, E04, R20, R30
Hair - E53, E55, E57, E59
Shirt - B91, B93, B95, B97
Trousers & Cap Trim - W5, W7, W9
Belt & Boots - C5, C7, C8
Blue on Hat - B93, B95, B97, B99
Gold - Y21, Y23, Y26, Y28
Ground - W1, W3, W5

And that's all from me for this post folks! Thanks for stopping by and don't forget to pop on over to the Little Miss Muffet Stamps Challenge Blog and check out all the other fabulous creations from the rest of the DT and why not join in the fun whilst you are there too?! As always there are some fabulous prizes to be won! 

Ching-Chou Kuik Inspiration Post - Autumn Rose

Good Morning and welcome to another DT inspiration post from me for Ching-Chou Kuik. This week the DT were challenged to use yellow, orange or both on their projects. Not colours I would usually use to be honest (I tend to use yellow for summer cards and orange for Hallowe'en but rarely do I use them otherwise), but with this image those colours work really well.

I used Autumn Rose and added touches of brown to balance out the orange and yellow. I used some old patterned papers from Stampin' Up that were from an Autumn themed set really and they worked perfectly!

This card is also for

Recipe:

Stamps: Autumn Rose from Ching-Chou Kuik, Background Bits from Stampin' Up

Papers: Daffodil Delight, Soft Suede, Haiku DSP (Retired) & Greenhouse Gala DSP (Retired) all from Stampin' Up, Super Smooth Card from That Craft Place

Inks: Tangerine Tango from Stampin' Up, Copic Markers

Accessories: Daffodil delight Ribbon Retired) from Stampin' Up, Vintage Floral Punch Around The Page Set from Martha Stewart, Roses from Wild Orchid Crafts

Copics Used:
Skin - E000, E00, E21, E11, E04, R20, R30
Hair - E99, E15, E18
Eyes - E44, E47
Lips - E43, E44
Cloak - YR21, YR23, YR24, YR27
Dress - YR15, YR16, YR18
Jewellery - Y06, Y08, YR16
Roses - Y11, Y15, Y19, E33
Leaves - G05, G14
Dots - Y11, Y17, YR21, YR15, YR02

And that's all from me for this post folks! Thanks for stopping by and don't forget to pop on over to the Ching-Chou Kuik Inspiration and Challenge blog and check out all the other inspiration from the rest of the DT and why not join in our monthly challenge whilst you are there too.

Scrapper's Delight - Winnie Halloween Witch

I thought I would share with you today a colouring I did for my quotes journal, although this isn't really a quote as such, just a gorgeous image that I loved and made too big for a card, so I thought I would add it in this book instead.

My lovely friend Janice designed this amazing image for her store Scrapper's Delight and I had to have her immediately. If you haven't noticed I love all things Hallowe'en and this image was another to add to my ever increasing collection of Hallowe'en images.

I also added (after I had finished the colouring mind you!), the wall, lamp, raven and bats from my new Stampin' Up set, Graveyard Gate. Had I thought about it beforehand I would have added in a proper graveyard scene with some gravestones etc but it only occurred to me when I was looking for sentiments to use and remembered this stamp set!

This project is also for

Recipe:

Stamps: Winnie Halloween Witch 1 from Scrapper's Delight, Graveyard Gate from Stampin' Up, Happy 31st Sentiments from C.C.Designs

Papers: Basic Black & Halloween Night DSP (Retired) both from Stampin' Up, Super Smooth Card from That Craft Place

Inks: Basic Black from Stampin' Up, Copic Markers, Silver At You Spica Pen

Accessories: Spiderweb Corner Die from eBay

Copics Used:
Skin - E000, E00, E21, E11, E04, R20, R30
Hair - G24, G05, G28
Hat & Cloak - C5, C7, C8, C9
Buckle - YR21, YR23, YR24
Skirt, Shoes & Clock Hands - C7, C8, C9
Violet - V01, V04, V05, V06, V09
Lime Green - YG01, YG03, YG05, YG07
Tights - V93, V95, V99
Orange on bag - YR12, YR16, YR18
Broom - E08, E09, E18, E35, E15, E99, E57, E59
Clock - Y0000, Y00, Y11, YR31, Y02
Pumpkins - YR04, YR68, YR07, YR09, E15, E18, Y13, Y15, Y19
Ground - W1, W3, W5, W7
Sky - C00, C0, C1, C2, C3, C5

And that's all from me for this post folks! Thanks for stopping by!

Ching-Chou Kuik Challenge - Monochromatic Colours

Good Morning! I just managed to squeeze this card in on time as I was totally convinced that July 1st was on Sunday, not on Saturday! Our challenge this month is to make a monochromatic project and I went for the traditional black and white and shades in between colour scheme.

I used the gorgeous After Midnight for my card and used lots of layers and scraps of patterned papers on a large 7.5" square card. I kept this one fairly flat and it is going to a lovely friend of mine through the post.


Recipe:

Stamps: After Midnight from Ching-Chou Kuik Digital Stamps, Sassy Salutations from Stampin' Up

Papers: Basic Black, Whisper White & Modern Medley DSP (Retired) all from Stampin' Up, Super Smooth Card from That Craft Place, Card blank from Every Crafts A Pound

Inks: Memento Tuxedo Black, Copic Markers, Silver At You Spica Pen, Clear Star Gelly Roll Pen

Accessories: Whisper White Ribbon (Retired) & Whisper White Baker's Twine both from Stampin' Up, Flower Die from Nellie's, Oval and Scalloped Oval Nestabilities & Floral Oval Dies all from Spellbinders, Pearls & Charm all from stash, Loopy Bloom Dies from Verve Stamps, Deco Borders from The Works

Copics Used:
Skin - E000, E00, E21, E11, E04, R20, R30
Black - C5, C7, C9
Dress - C00, C0, C1, C3, C5
Dots - C0, C5, C9

And that's all from me for this post folks! Thanks for stopping by and don't forget to pop on over to the Ching-Chou Kuik Inspiration and Challenge blog and check out all the other fabulous cards from the DT this month and why not join in the fun whilst you  are there too?!

Sherri Baldy New Release My Besties Giggle Box Img269

Good evening and I am almost back on track. I have a huge thing going on tomorrow and have spent all week preparing various things for it and just have the final checks to do tonight ready for the morning and then hopefully I will have more time to myself in the evenings!

So huge apologies to everyone for this project being so late! Anyway this is Sherri's new release Giggle Box Img269 and isn't she just adorable?! I made a trifold card and paired her up with some old retired patterned papers from Stampin' Up. I really do wish they had released these for longer as I love the colour combo on these ones!

This card is also for

Recipe:

Stamps: My Besties Giggle Box Img269 from Sherri Baldy, Sassy Salutations (Retired) from Stampin' Up, Pretty Peonies from Papertrey Ink

Papers: Real Red, Crumb Cake, Whisper White & Fresh Prints DSP (Retired) all from Stampin' Up, Super Smooth Card from That Craft Place

Inks: Real Red & Crumb Cake both from Stampin' Up, Copic Markers

Accessories: Pool Party Ribbon (Retired) from Stampin' Up, Beautiful Blooms II Dies #3 & Pretty Peonies Dies both from Papertrey Ink, Card Candi from Craftwork Cards, Create A Daisy Dies from Spellbinders

Copics Used:
Skin - E000, E00, E21, E11, E04, R20, R30
Hair - E21, E25, E27
Eyes - E43, E44, E47
Flowers & Dress - R32, R35, R37, R39, C0, C2
Bow - BG11, BG13, BG15, BG18
Grass - G21, G24, G28

And that's all from me for this post folks! Thanks for stopping by and don't forget to pop on over to the My Besties Facebook group and check out all the other fabulous inspiration from the rest of the DT too. 

Craft Box February Project #1 with Wee Stamps Poppy

Good Morning and welcome to my first project this month for Craft Box. I decided to use lots of the fairy elements, charms and flowers on this free-standing plaque/monolith. I bought a load of these from That Craft Place before Christmas with the intention on making all my friends and family a free standing calendar each. I managed 2! I had gessoed this one ready to make, but never got round to it and feel it's a bit late to give people a calendar now!

So anyway I added some bricks using my stencil from Dutch Doobadoo and then mixed sage green and silver paint together to make a shimmery green before adding lots of the goodies from Craft Box and lots of die cuts as well.

Here is the front.... Isn't Poppy just adorable?!


And the back... The quote is the first line from a poem I found on Pinterest. 

This project is also for
Recipe:

Stamps: Poppy from Wee Stamps, Labeler Alphabet from Stampin' Up

Papers: Always Artichoke & Basic Black both from Stampin' Up, Pink Card & patterned papers all from Craft Box, Super Smooth Card from That Craft Place

Inks: Rose Red from Stampin' Up, Copic Markers, Sage & Mocha Paints from Docrafts, Silver Metallic Paint from Boldmere

Accessories: Die-Namics Fresh Cut Grass Dies from MFT, Beautiful Flowers Stencil Die BF06 from Studio Light, Willow Twig 1 from Crafts & You Design, Mini Fairies Dies from Joanna Sheen, Bricks Mask Art & Structure Paste both from Dutch Doobadoo, Small Flowers from Wild Orchid Crafts, Butterflies Dies LR0158 from Marianne Design, Big Flowers, Charms, Fairy Door & Lace all from February Craft Box

Copics Used:
Skin - E000, E00, E21, E11, E04, R20, R30
Hair - E21, E25, E27, E29
Eyes & Leaves - G43, G46
Outfit & Hairband - RV11, RV32,  RV34
Wings - RV0000, BG0000, BG000, BG02
Toadstool - R22, R24, R27, R29, E70, E71, E74, E77, E41, E42, E43
Flowers - RV52, RV55

And that's all from me for this post folks! Thanks for stopping by and don't forget to pop on over to the Craft Boxers Facebook Group and check out all the other gorgeous inspiration from the DT this month too.

Art by MiRan Facebook Team's January Anything Goes Challenge

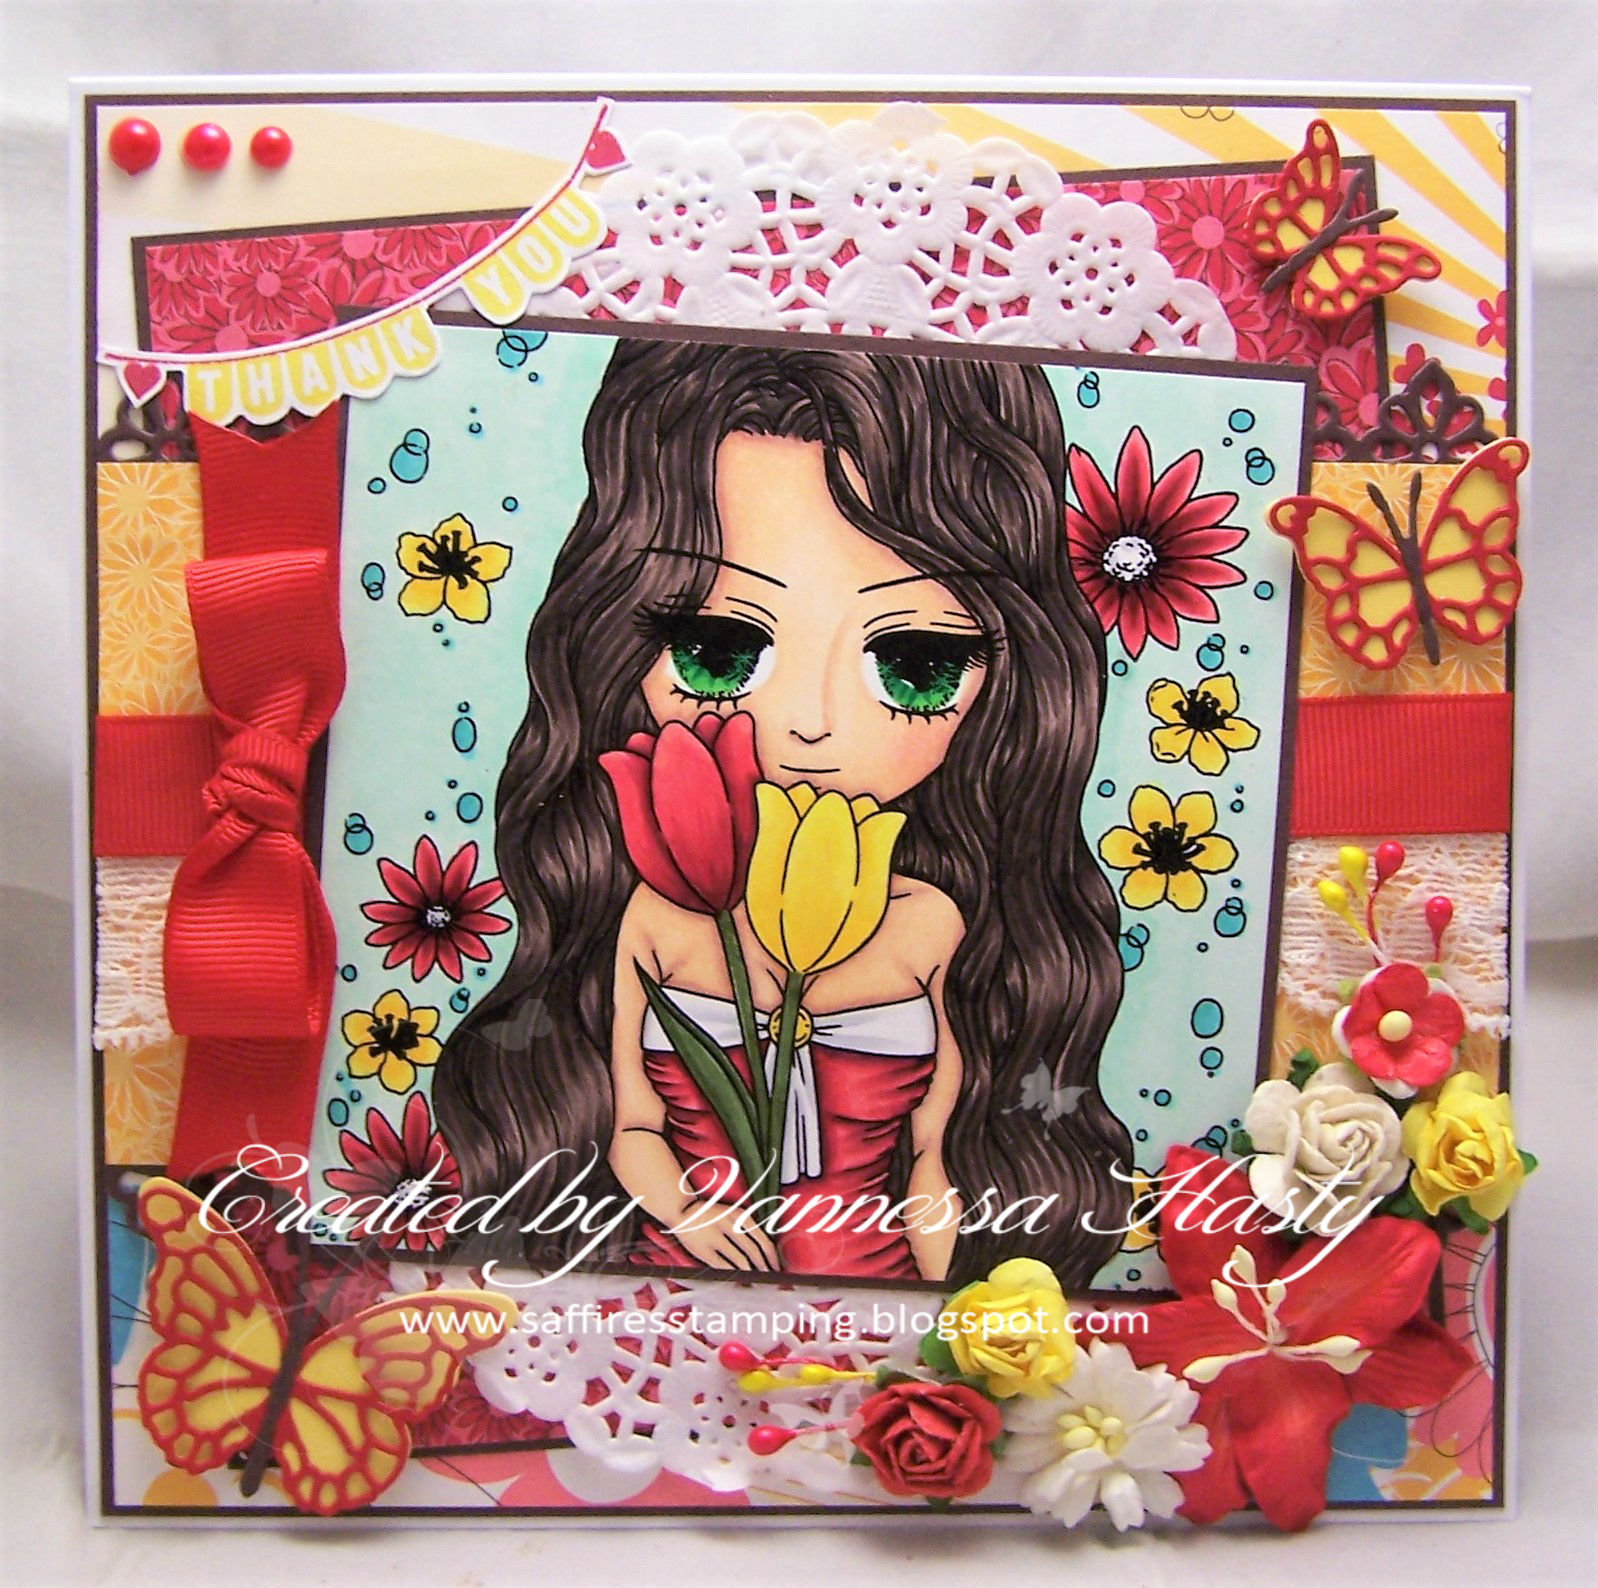
Good evening and welcome to my post for the new anything goes challenge at the Art by MiRan  Facebook Group. This month our challenge has the optional twist of making a thank you or a goodbye project. I opted for a thank you card (you can never have too many of those!) and used the gorgeous Tulipa in lots of bright red and yellow.

This card is also for
As You Like It Challenge Your Favourite Flower and Why (I love tulips as they indicate to me the start of Spring and warmer weather and I also love the range of colours they come in!)

Recipe:

Stamps: Tulipa from Art by MiRan, Any Occasion from Stampin' Up

Papers: Chocolate Chip, Real Red, Daffodil Delight & Pink Flamingo DSP (Retired) all from Stampin' Up, Super Smooth Card from That Craft Place

Inks: Real Red & Daffodil Delight both from Stampin' Up, Copic Markers

Accessories: Real Red Ribbon (Retired) from Stampin' Up, Pearls & Doily both from stash, Lace from local market, Stamens & Flowers from Wild Orchid Crafts & eBay, Leavenworth & Cascadia Butterfly Trio Dies both from Memory Box

Copics Used:
Skin - E000, E00, E21, E11, E04, R20, R30
Hair - E74, E77, E79
Eyes - YG06, G14, G17
Red - R32, R35, R37, R39
Yellow - Y13, Y15, Y19
Centre of yellow flowers - C9
Bubbles - BG02, BG32, BG23
Leaves & Stems - G94, G99
Shading on white - C1, C2
Background - G0000, G000, G00

And that's all from me for this post folks! Thanks for stopping by and don't forget to pop on over to the Art by MiRan Facebook group and check out all the other gorgeous cards from the rest of the DT and why not join in the fun whilst you are there too?!

Ching-Chou Kuik Inspiration Post - Holly Angel

Good Morning and welcome to my inspiration post for the Ching-Chou Kuik Inspiration and Challenge blog. This week the DT's challenge was to use red, green or both for their inspiration card, so I went with both to make another Christmas card. I have about 30 made so far and will probably still need to fair few more, so any opportunity I can I make one!

I have used the gorgeous Holly Angel for this one and went for both red and green, keeping the card fairly simple for posting!


This card is also for
Recipe:

Stamps: Holly Angel from Ching-Chou Kuik, Sassy Salutations from Stampin' Up

Papers: Old Olive & Holiday Treasures DSP (Retired) both from Stampin' Up, Card base from Crafts UK Limited, Super Smooth Card from That Craft Place

Inks: Ruby Red (Retired) from Stampin' Up, Copic Markers, Clear Wink of Stella

Accessories: Old Olive Ribbon (Retired), Filigree Holly Dies from Creative Expressions

Copics Used:
Skin - E000, E00, E21, E11, E04, R20, R30
Hair - E21, E25, E27, E29
Eyes - G43, G46
Dress & Bow - R43, R35, R37, R39
Berries - RV29, R56, R59
Leaves - G94, G99
Bird & Wings - C0
Beaks - Y38
Background - G0000, G000, G00

And that's all from me for this post folks! Thanks for stopping by and don't forget to pop on over to the Ching-Chou Kuik Inspiration and Challenge blog this week to check out all the other gorgeous cards from the DT.

Hearts Quest Fantasy Challenge #53 & Saturday's Crafty Creations #11 Featuring Gnometastic Birthday Surprise from Polkadoodles

Good morning! Long time no see as well. I have really struggled to find any crafty mojo over the past couple of months, but I made a few ca...